Spring-based Animation and Quaternions
01 September, 2025
- The Use Case
- What About Tweening?
- What’s in a Spring?
- Spring Transforms
- That’s All… ?
- Delta Time
- Detecting Rest States
- Performance
- Notes From the Future
- Resources
Spring animation is a fairly new technique for animating stuff going between two points. It works by simulating a real physical spring, which gives you a really nice and responsive animation.
The difference maker here is that the spring is physically based, so it always feels “right” to creatures of Earth.
In fact, springs feel so right that they’ve seen widespread adoption in UI toolkits. If you’ve used an Apple product it’s everywhere, Android has had the DynamicAnimation library since 2019, and react-spring has been around for at least that long as well.
How many different springs do you spot? It’s more than 4.
Maybe check out this interesting article for a sort-of history of spring-based animation.
Games haven’t seen nearly as much adoption though. It’s common to animate cameras using springs, but otherwise they still feel like a bit of a secret. I feel like an obvious application is to apply them to game object transforms for some convenient, flexible, good looking animation, but I really couldn’t find much of anything out there. So I made this post.
Specifically I’m referring to Unity-style transforms, with separate translation, rotation, and scale components.
The main spanner-in-the-works when building a Spring Transform is applying springs to quaternions, but this ends up not being such a big deal in the end.
This post and the provided code will be Unity-like, but the concepts are easily applicable everywhere.
The Use Case
The use case for this is basically any transition that wants animating, but the real win is for interactive elements:
- Doors/door handles/drawers.
- Switches/buttons/levers.
- Level editors (moving, rotating pieces).
- Procedural animation (look-at systems, gun reloads, etc).
The procedural animation case is a bit open ended, but these examples all feel a lot better when they respond well to interruption, which is the spring’s specialty. The other bonus is that you don’t need to track any additional state for whether the door/lever/switch is open or closed — just tell it what to be and let the spring handle the rest.
What About Tweening?
Something that does have widespread use in games is (inbe)tweening, otherwise known as easing. There are many libraries that accomplish this for all major and minor game engines:
- PrimeTween (Unity)
- Tween (Godot – Built-In)
- Fresh Cooked Tweens (Unreal)
My gripe with tweening is that it’s non-trivial to interrupt a tween and have it react in natural way. Most applications just reset the tween to the beginning each time (yuck), or worse: force you to wait until the end of the tween to use the element again (guck).
Tween resetting on each click, yuck.
Sometimes, developers say “I can fix that”, and have gone to great lengths to make the tween react “smoothly”;
A demo from InTween where they’ve used some smoothen() magic to try to handle spamming inputs.
No matter your determination, it just never quite works right. In this one, the tail end of the animation has a noticeable curve after multiple clicks, and the speed is pretty jumpy as well. Compare this to the spring demo below—it’s night and day:
Fluid motion regardless of interruptions.
Spring-based animation is not necessarily better than tweening in all scenarios—they both have their place. Tweening can be a good solution when you have a set target, a time you want to reach that target by, and there are no interruptions. You get a lot of control over the particular animation, and you can even use a custom curve to get it looking exactly how you like.
Usually tweens that are fast to start and slow to finish feel the most responsive and hide their shortcomings best; e.g.
EaseOutCirc.
If your animation needs to respond to interruptions well (most interactive things should), then this is the problem that damped springs solve.
What’s in a Spring?
I’ve modified Ryan Juckett’s iconic Damped Springs code for my spring simulation. His post is a great technical explainer, and I recommend it if you’re a geek.
The layman’s version is that a spring is just a function. You pass in: position, velocity, target position. You get back: position, velocity. How the spring behaves (how quickly your position reaches its target, does it bounce or not, etc) depends on some constant values that are calculated when you initialise the spring.
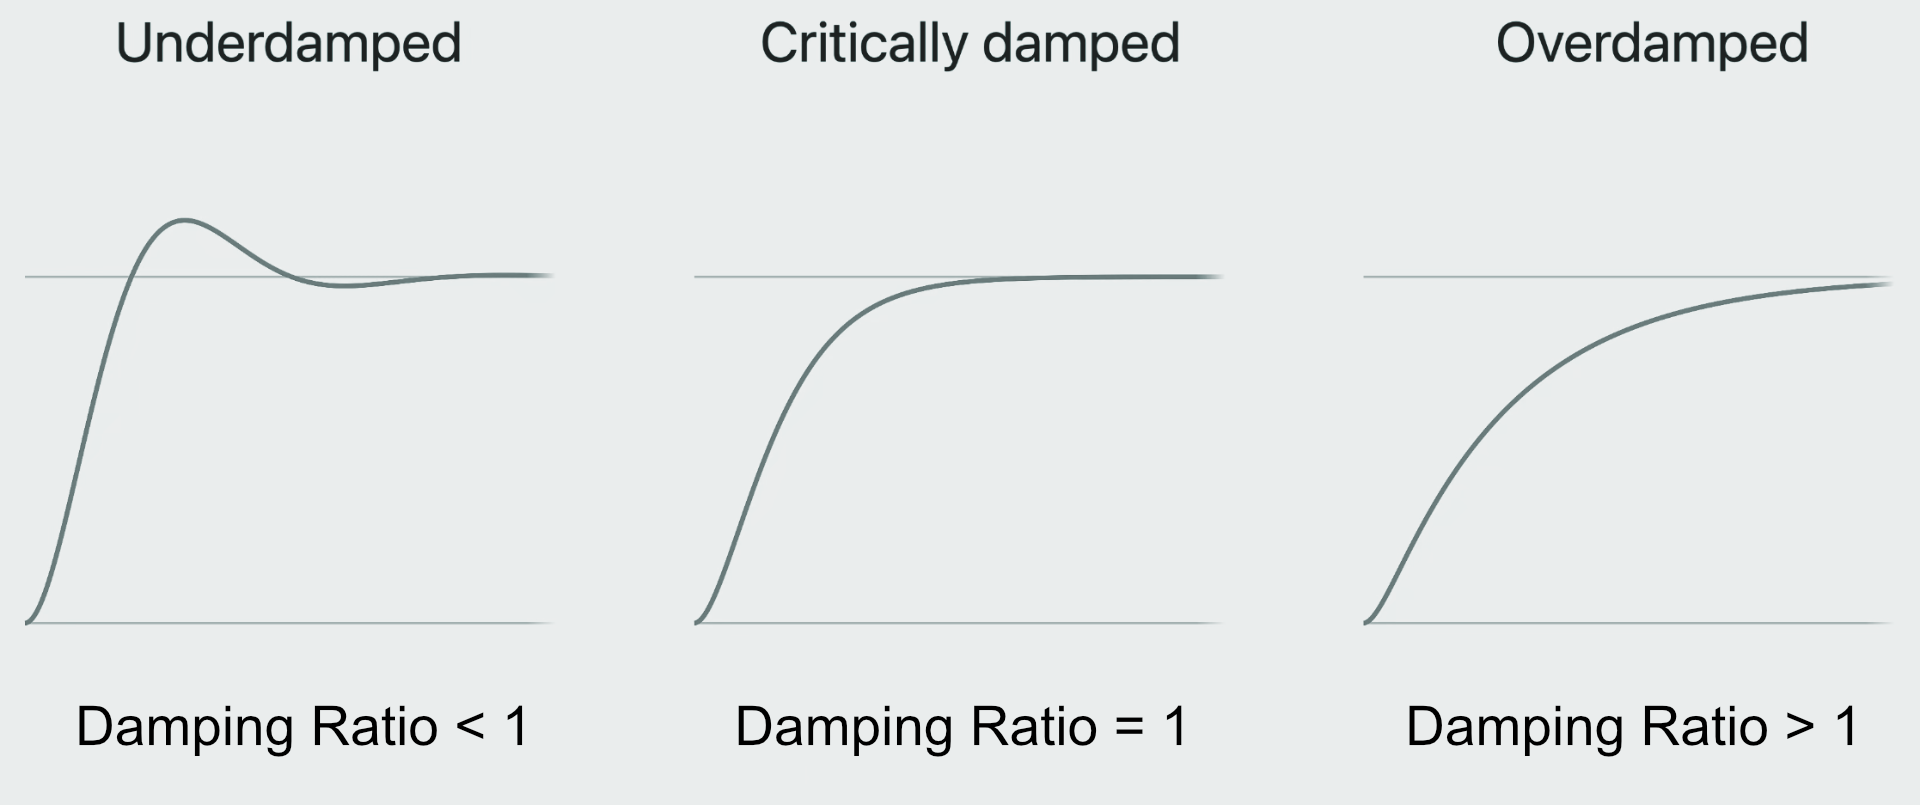
Not all damped spring implementations are the same, but they usually share similar controls. Here are the parameters that Ryan’s implementation uses to calculate those constants I mentioned:
- Angular Frequency — Controls how fast the spring oscillates (can loosely think of this as speed).
- Damping Ratio — Controls how fast the motion decays.
- Damping Ratio < 1: Underdamped (some bounce)
- Damping Ratio == 1: Critically damped (never bounce)
- Damping Ratio > 1: Overdamped (smooth curve toward target)
- Delta Time — Time between updates—you’re probably familiar, but more on this (much) later.
 A visual stolen from Apple’s Animate with springs presentation (WWDC23), but reworded to match our definitions.
For this implementation, those human-accessible controls are used to produce 4 coefficients;

Then, we simply use them:
// Perform one "step" of the spring.
private static (float, float) StepSpring(float current, float velocity, float target) {
    float dist = current - target;
    float pos = target + dist * POSPOS_COEF + velocity * POSVEL_COEF;
    float vel = dist * VELPOS_COEF + velocity * VELVEL_COEF;
    return (pos, vel);
}
All we’re doing is calculating a new position and velocity based on distance and those coefficients. There really is no magic going on here.
Spring Transforms
A Spring Transform is just a spring applied to all the components of a transform (position, rotation, scale). The idea is that you have some target transform, for which you set your target position, rotation, scale, and then the actual transform just interpolates towards that using the wonders of spring technology.
Translation and Scale Are Easy
Translation and scale require next-to no modification. Just step the spring over all 3 dimensions:
private static (Vector3, Vector3) StepSpring(Vector3 current, Vector3 velocity, Vector3 target) {
    Vector3 p;
    Vector3 v;
    (p.x, v.x) = StepSpring(current.x, target.x, oldVel.x, co);
    (p.y, v.y) = StepSpring(current.y, target.y, oldVel.y, co);
    (p.z, v.z) = StepSpring(current.z, target.z, oldVel.z, co);
    return (p, v);
}
Damping Ratio: 0.6, Angular Frequency: 15.0
How the blah does it all connect? Here’s how you might use all that to affect your transform:
// `targetTransform` is just a struct with target values (t,r,s).
Vector3 current = transform.localPosition;
Vector3 target = targetTransform.localPosition;

(Vector3 newPos, Vector3 newVel) = StepSpring(current, m_velocityPos, target);
transform.localPosition = newPos; // Assign back to our actual transform so that our object moves.
m_velocityPos = newVel;

// Then, repeat for the scale component.
// ...
If you’re hollering at your screen about all the unnecessary copying happening in my
StepSpring()functions, put down your lobster and relax. This code is written with the primary goal being ease of understanding.
Rotation Is Tricky
I can’t tell you how much failure I went through trying to apply damped springs to a rotation component. Actually, I can and I will.
The solution I’ve come to is conceptually simple though—all great solutions are—so I feel confident about it.
If you’re here for answers, dammit, then… skip!
The Naive Approach
So, a quaternion in a computer is really just 4 floats. What happens if we just feed those into the spring function? Something pretty good, actually:
Maybe even good enough to use. But there are bugs under the rug—the biggest one being that rotation doesn’t always take the shortest path, so you often get this weird flipping behaviour that looks bad. Once I noticed this, I couldn’t look past it.
We’re also violating quaternions a bit here, evidenced by the fact that we have to re-normalize each step to prevent skewing. This is far from the panacea.
Axis Angles
Another thing we can do is change our representation of rotation velocity to something that’s easier to use with a spring.
The idea is that we replace our velocity with a vector for the axis and an angle. Each iteration, convert the current and target rotations to axis angle representations, and then use the spring on that. A trick here is to encode the angle into the vector’s length, which saves you some bother dealing with positive/negative angles when the axis flips and stuff like that.
In the posts below we end up visualising velocity via axis angle. Here’s how it looks:
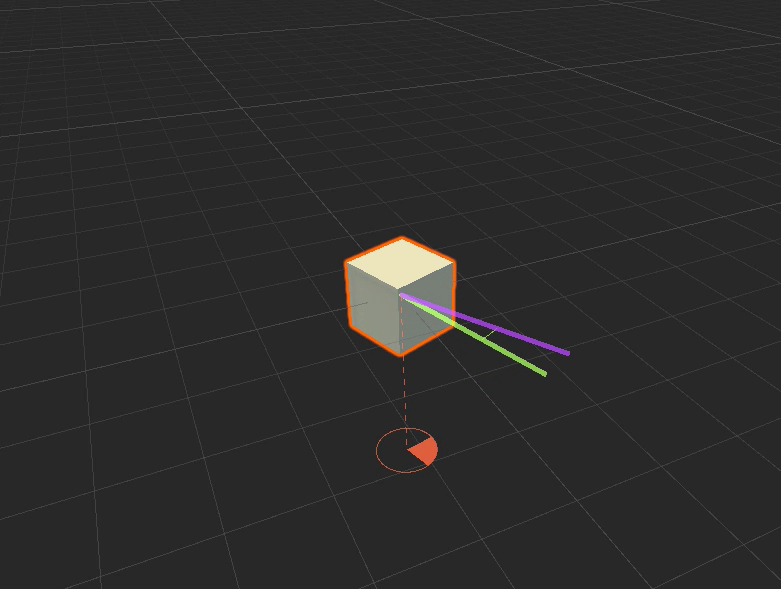 Dotted orangle line: axis. Orange slice of pizza: angle.
Hopefully that all makes sense conceptually. You have this rotational velocity vector which you calculate and apply each iteration, underpinned by the spring system.
But there’s problems here too. When you move toward the new rotation axis, you’re effectively doing a linear interpolation (as opposed to a spherical linear interpolation), which means the movement is technically incorrect.
It’s best illustrated if you imagine the traditional situation where we want to turn some object to face a different direction. In the following, one arrow represents the direction the object is currently facing, and one represents the direction we want to be facing (it doesn’t matter which is which).
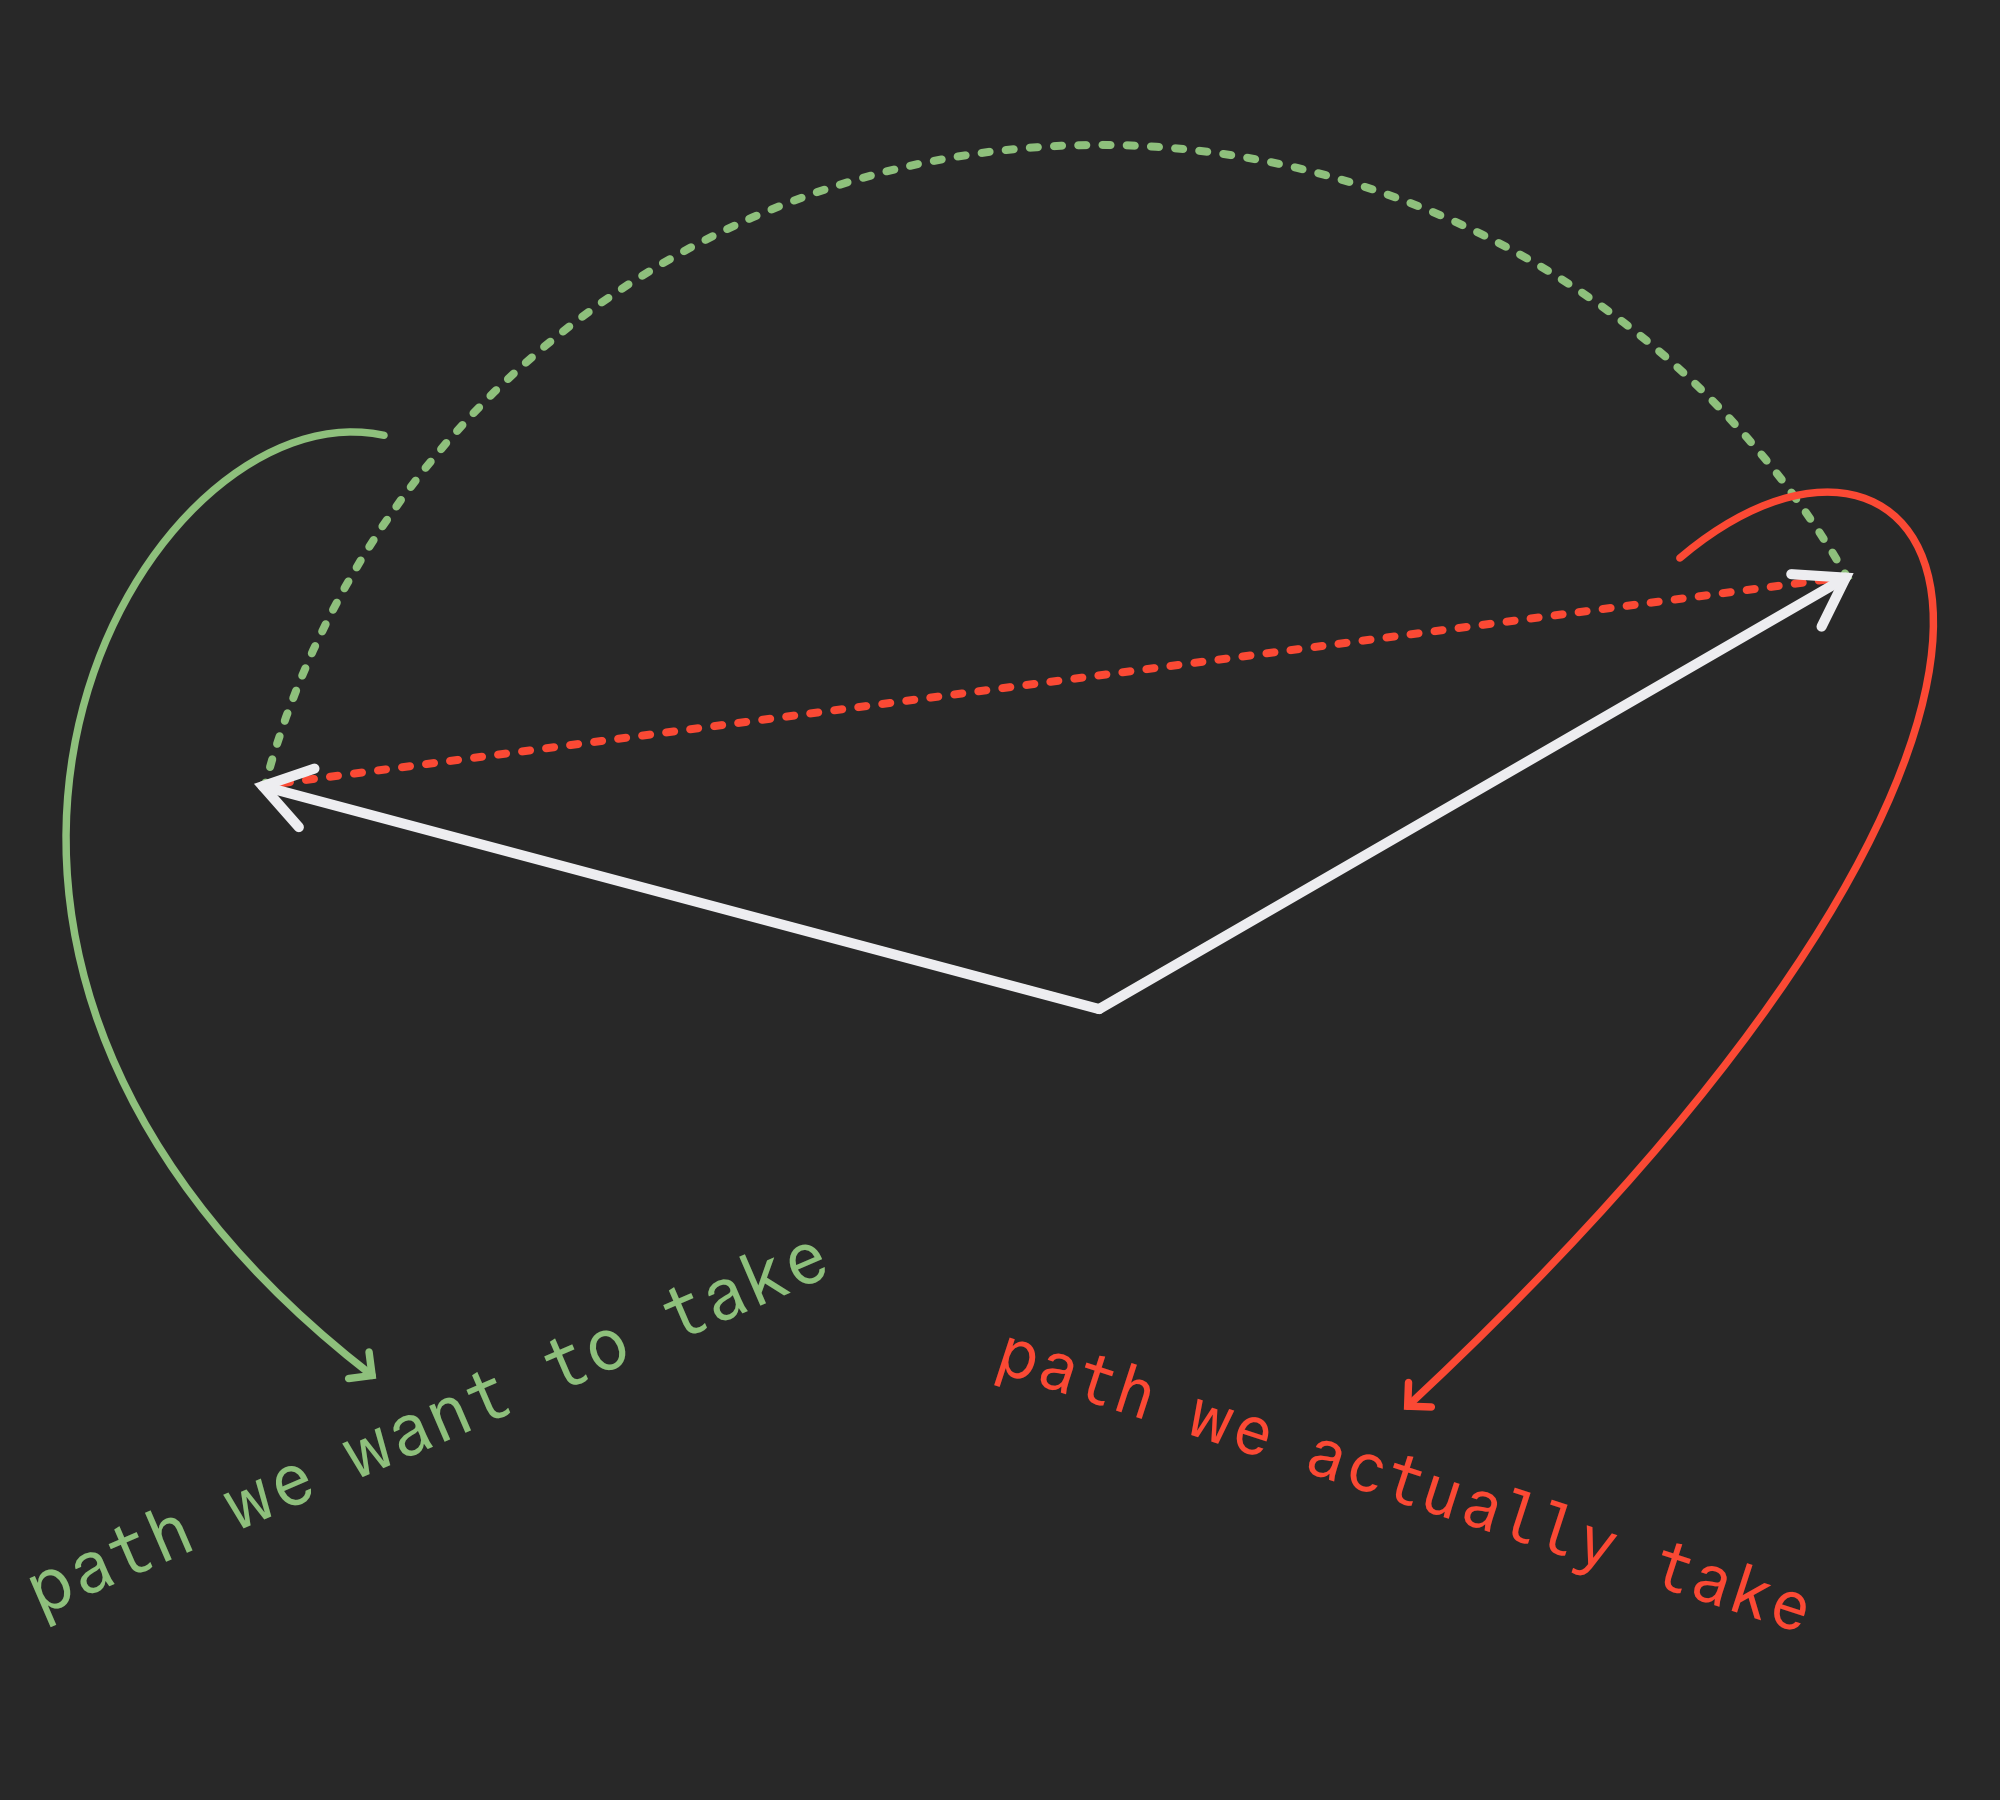 Slerp (green) vs Lerp (red)
The red path is much shorter! And insidiously, the speed is inconsistent—we spend much more time at the edges of our path than we do in the middle;
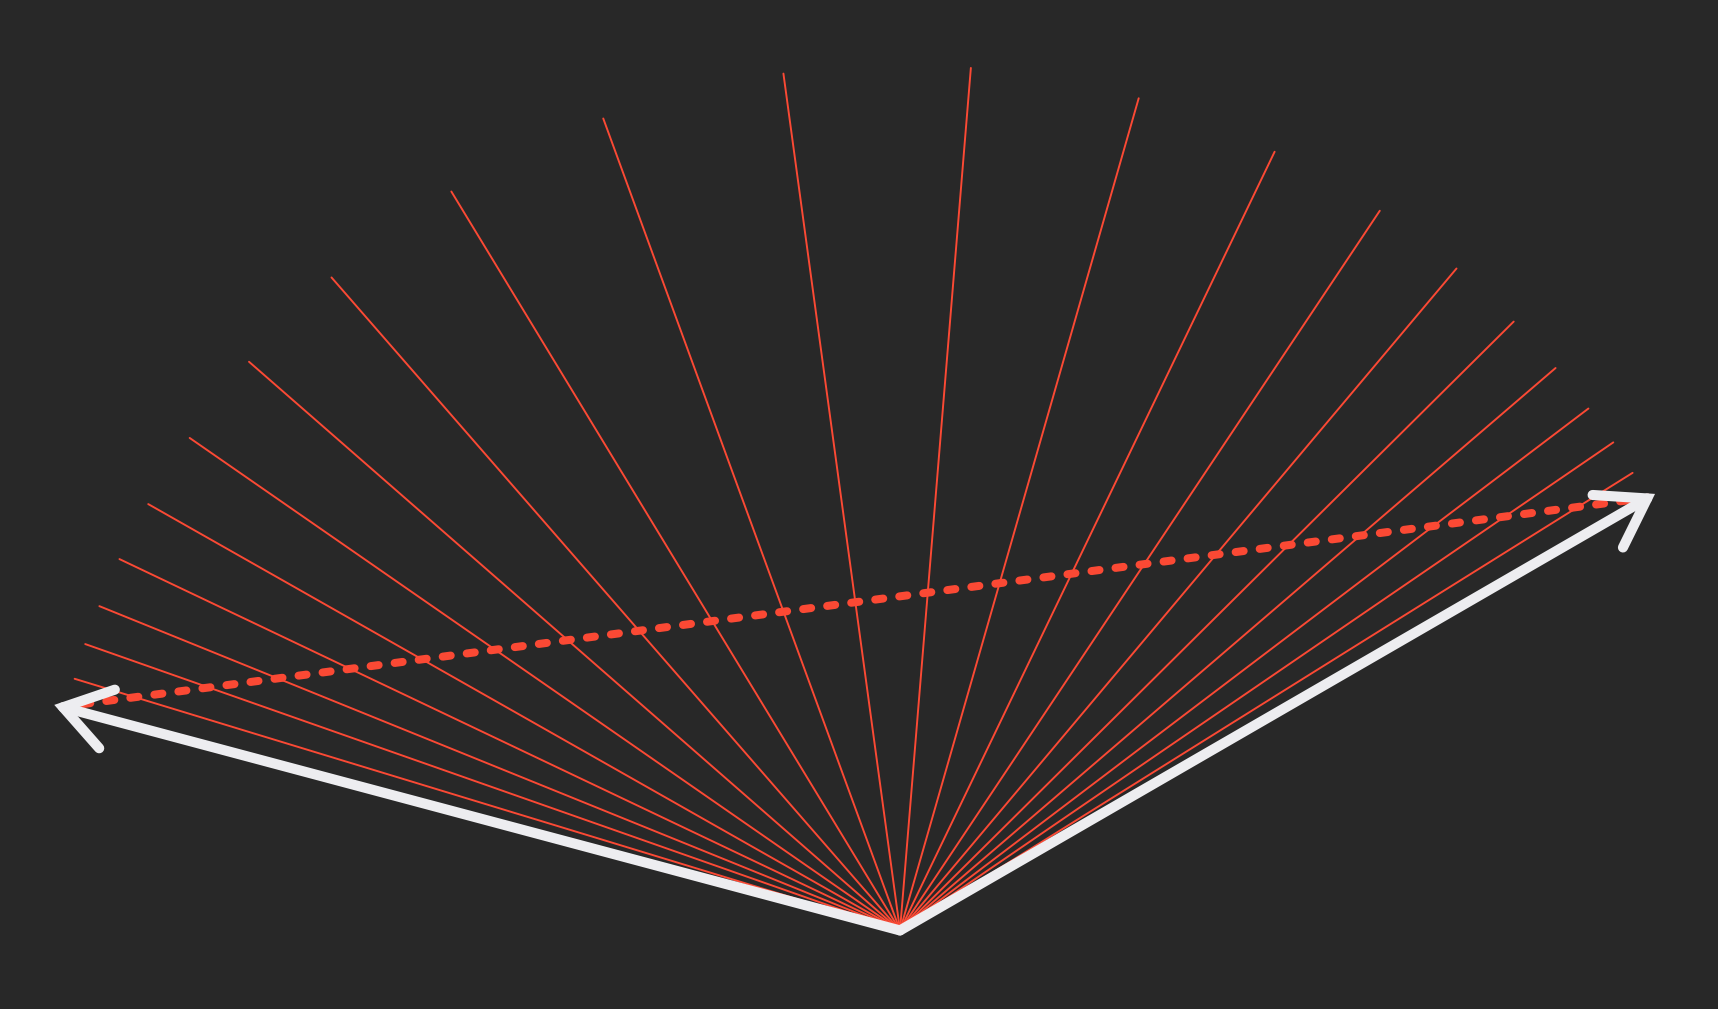 These lines intersect with the path at even intervals, I promise.
Our rotation axis is making this same error when we’re stepping our spring towards the new axis. We’re just interpolating from one rotation axis to the next, without care for the spherical nature of it all. But honestly, in spite of all my scaremongering, you can pretty much get away with this. I think you’d struggle to find anyone who’d notice the difference—it’s much harder to see when we’re talking about rotation axes instead of directions, and it only really occurs when a lot of movement is already happening. There’s something wrong with me though, so my search continued.
Unfortunately, I don’t have any code for this approach anymore. Here’s a Stack Overflow answer that outlines one implementation, although it may take a bit of elbow grease to use with the spring system implemented here.
Spherical Coordinates
I also gave spherical coordinates a shot. It sounded sane: convert rotation to a spherical coordinate (these are described by 2 angles and a distance from the origin), do all of the spring calculations in that space, and then finally convert it back and build a rotation out of it.
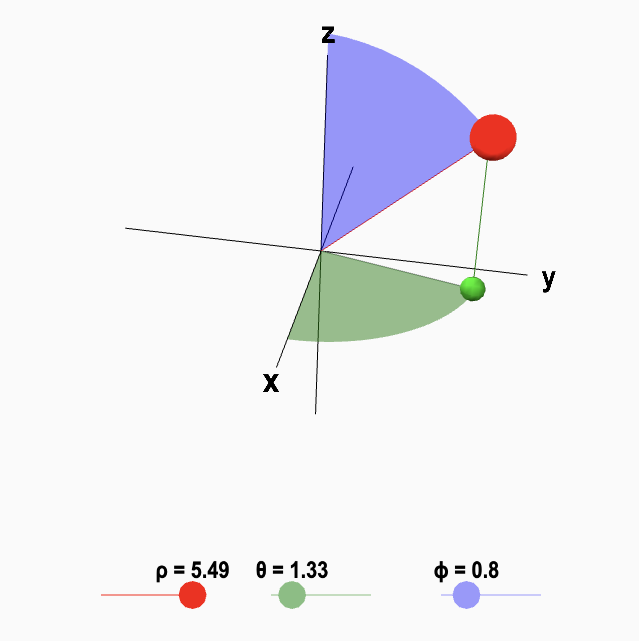 Spherical coordinates, they look like this.
But I imagine all the math guys are tossing their heads back and slapping their knees right now, because it turns out it’s actually quite difficult to get velocity—or really any kind of translation—in spherical coordinates. θ and Φ are essentially longitude and latitude, so if you want to travel across the sphere along a particular path, you need to manage the complicated non-linear relationship between them. If that’s not bad enough, you’ll also need to handle the angles flipping as you cross particular planes:
https://mathinsight.org/spherical_coordinates
There are some papers describing how to work out these sorts of things in spherical coordinates, but it really just felt to me that spherical coordinates are more useful for describe a coordinate, rather than a space to work in and do translations and such.
Maybe I’m missing something with this one, I don’t know. But there should be a simpler answer than this.
Just Use Quaternions
Why don’t we just use quaternions? It makes sense. We have a quaternion for the current orientation, a quaternion for the target orientation, and a velocity quaternion. We just need to fully understand things to get the rotations right.
Now, I hear you: “Quaternions can’t represent rotations larger than 180 degrees! Your velocity quaternion is going to be ruined!” Sure. I saw this discussion a fair bit, and it turned me off using them for a while. But do we really need to be concerned about rotating more than 180 degrees in a single step? With the way our calculations currently work, the velocity variable gets quite large at one of the in-between stages, but we can avoid that, and I’ll show you how.
Here’s how a basic implementation might look for our spring rotation. We do have to write a pretty different StepSpring() function here, so I’ve copied over some commented code from the base implementation to make things easier to follow:
private static Quaternion Multiply(Quaternion input, float scalar) {
    return new Quaternion(input.x * scalar, input.y * scalar, input.z * scalar, input.w * scalar);
}

private static Quaternion ShortestRotation(Quaternion a, Quaternion b) {
    if (Quaternion.Dot(a, b) < 0.0f) {
        return a * Quaternion.Inverse(Multiply(b, -1.0f));
    } else {
        return a * Quaternion.Inverse(b);
    }
}

private (Quaternion, Quaternion) StepSpring(Quaternion current, Quaternion velocity, Quaternion target) {
	Quaternion p;
	Quaternion v;

    //float dist = current - target;
    Quaternion fromTo = ShortestRotation(current, target);  // From target to current.
    {
        // dist * POSPOS_COEF
        Quaternion q1 = Quaternion.SlerpUnclamped(Quaternion.identity, fromTo, POSPOS_COEF);
        // velocity * POSVEL_COEF
        Quaternion q2 = Quaternion.SlerpUnclamped(Quaternion.identity, oldVelocity, POSVEL_COEF);
        //float pos = target + dist * POSPOS_COEF + velocity * POSVEL_COEF;
        p = q1 * (q2 * target);
    }

    {
        // dist * VELPOS_COEF
        Quaternion q1 = Quaternion.SlerpUnclamped(Quaternion.identity, fromTo, VELPOS_COEF);
        // velocity * VELVEL_COEF
        Quaternion q2 = Quaternion.SlerpUnclamped(Quaternion.identity, oldVelocity, VELVEL_COEF);
        // float vel = dist * VELPOS_COEF + velocity * VELVEL_COEF;
        v = q1 * q2;
    }

    return (p, v);
}
You can think of SlerpUnclamped() with an identity rotation as a spherical multiplication. As such, you also don’t need to worry about normalising the result.
Purple - target direction, Green - current direction, Orange - velocity axis and angle. Overdamped spring.
This approach works pretty well until the velocity exceeds 180 degrees, where it gets very confused. It also works for under-damped springs, which I found tricky with an axis-angle approach:
Overcoming Velocity Too Big turns out to just be a matter of looking more closely at the relationship between position and velocity calculations;
float dist = current - target;
// `velocity` here is `vel` from the previous step.
float pos = target + dist * POSPOS_COEF + velocity * POSVEL_COEF;
float vel = dist * VELPOS_COEF + velocity * VELVEL_COEF;
In particular, we notice that velocity always gets multiplied by POSVEL_COEF before being applied, which gives us the actual amount of velocity added to position each step. As you may guess, POSVEL_COEF is really small! New velocity is ultimately derived from dist, so we can effectively pre-apply this multiply by moving it into the velocity calculation instead:
float pos = target + dist * POSPOS_COEF + oldVel;
float vel = dist * VELPOS_COEF * POSVEL_COEF + oldVel * VELVEL_COEF;
Here’s a Desmos graph, if you wanted to play around: https://www.desmos.com/calculator/q6fbtp4yfl.
I always try to be certain I haven’t unintentionally broken something, and in this case it’s easy. Just simulate both versions side by side, and make sure they match:
// Old.
Vector3 current = t.localPosition;
Vector3 target = m_targetTransform.position;

(Vector3 newPos0, Vector3 newVel0) = StepSpringOld(current, m_velocityPos0, target);
(Vector3 newPos1, Vector3 newVel1) = StepSpringNew(currentNew, m_velocityPos1, target);
m_velocityPos0 = newVel0;
m_velocityPos1 = newVel1;

// Returns true if two vectors are approximately equal (https://docs.unity3d.com/6000.0/Documentation/ScriptReference/Vector3-operator_eq.html).
Debug.AssertFormat(newPos0 == newPos1, $"newPos0 does not match newPos1: 0: {newPos0}, 1: {newPos1}.");

// Doesn't really matter which we assign here -- they're the same.
t.localPosition = newPos0;
Of course, there’s nothing to show here because… nothing happens. The assert doesn’t fire.
Now just straightforwardly copy the concept over to our quaternion step:
private (Quaternion, Quaternion) StepSpring(Quaternion current, Quaternion velocity, Quaternion target) {
    Quaternion p;
    Quaternion v;

    // From target to current.
    Quaternion fromTo = ShortestRotation(current, target);

    {
        Quaternion q1 = Quaternion.SlerpUnclamped(Quaternion.identity, fromTo, this.posPosCoef);
        p = q1 * (velocity * target);
    }

    {
        Quaternion q1 = Quaternion.SlerpUnclamped(Quaternion.identity, fromTo, this.velPosCoef * this.posVelCoef);
        Quaternion q2 = Quaternion.SlerpUnclamped(Quaternion.identity, oldVelocity, this.velVelCoef);
        v = q1 * q2;
    }

    return (p, v);
}
With velocity a fraction of what it was before, we’re nowhere close to our 180 degree limit, even during fast movement:
Yum.
Of course, it’s not bulletproof. If you have an exceptionally fast rotating spring (> 180 degrees in a single step), you’ll still see issues. But I just don’t think that’s very realistic. Here’s a real fast spring with the angular frequency set to around 300(!), still not breaking that limit:
Fast springs are fine too.
That’s All… ?
So, now that you know how to step all the transform components, you can probably go ahead and make your own pretty good spring transform. So far, I’ve been pretty quiet about how the scaffolding around all this might look, and that’s because ultimately I don’t feel it has much value. The meat of this post is learning about springs, and stepping the components correctly.
I do, however, have some opinionated recommendations.
Here’s my implementation on GitHub if you’d like to take a more complete example: https://github.com/Toqozz/blog-code/blob/master/spring_transforms/Assets/SpringTransform.cs.
Delta Time
Juckett has the following note in his post:
Because simulating damped springs requires calls to potentially expensive trigonometric and exponential functions, I’ve split the process into two steps. The first computes a set of coefficients for the position and velocity parameters by expanding the relevant equations. These coefficients can then be used to quickly update multiple springs using the same angular frequency, damping ratio and time step. If your simulation updates at a locked time step, you can even cache off the coefficients once at initialization time and use them every frame!
Which gives you a few options.
You can run the simulation with a variable delta time by simply re-computing the coefficients with the current delta time before updating your spring. This is going to be slow eventually (hundreds of springs?).
Otherwise, you can run your spring update at a fixed timestep, using your engine’s capabilities or your own; check out the classic Gaffer On Games: Fix your Timestep! post for that.
I’ve also seen a different Update() formula that skips some steps here, but I’m not really sure what the tradeoffs are, so I’m hesitant to recommend it.
 public static void CalcDampedSimpleHarmonicMotion (
    ref float value,
    ref float velocity,
    float equilibriumPosition,
    float deltaTime,
    float angularFrequency,
    float dampingRatio)
{
    float x = value - equilibriumPosition;
    velocity += (-dampingRatio * velocity) - (angularFrequency * x);
    value += velocity * deltaTime ;
}
More info: https://gist.github.com/FleshMobProductions/7b523b81d7595e685410be11b24aac3f.
I can see both fixed timestep and variable timestep working well here. Fixed timestep is a bit more effort:
- Make a custom timestep loop.
- Handle interpolation so that things look smooth.
But ultimately more robust:
- Much better performance.
- Deterministic (at least on the same system).
- Immune to frame hitching (without this, you might feasibly break that 180 degree limit).
A variable timestep solution is fine too though. It’s more simple, and that has value.
For implementing a fixed timestep correctly, I once again point you to Gaffer On Games post above, which explains in more detail than I would here. The quick version:
- Accumulate
dtevery frame. - Once accumulated time is greater than the fixed timestep, update your things.
- Every frame, run one more temporary step and interpolate towards it depending on how much leftover time there is on the accumulator (
float lerpVal = accumulated / stepTime). Next frame, throw that result away and start again from the last solid step.
That last point is obviously the main piece of complexity. You want a system where you can run an additional temporary step, without modifying the data in such a way that you can’t go back to it for the next solid step.
Detecting Rest States
Wouldn’t it be useful if we had some way of telling when the spring had stopped moving? That way, we could easily chain movements together, or execute some code when it reached the target. This sounds trivial, but there’s a couple gotchas I thought I’d mention.
- You need to consider both closeness to target and velocity, to handle under-damped springs.
- In the Quaternion case, just checking equivalency won’t be enough as the same rotation can be represented in more than one way. You want to compare angles, or something more representative of the actual orientation instead.
- Unity’s standard
Quaternion.Angle()may not be accurate enough. You’ll probably want to seek alternatives with more precision. - https://discussions.unity.com/t/quaternion-toangleaxis-is-unprecise/248021.
- Unity’s standard
- At the extremes of bouncy or slow moving springs, you may need to get a little creative. The best option here is really to just make the calculation as accurate as possible and expose the resting thresholds to the user (with sensible defaults).
- Here’s what they do in
react-spring, nothing particularly exciting though.
- Here’s what they do in
- Once the spring is considered resting, it might be a good idea to assign the current position to the target position, and zero out the velocity.
- This ensures that both the rest position is perfect, and that the spring is truly resting, regardless of complications in the last point.
Performance
The performance of even a naive implementation is good. If you’re caching coefficients, each spring update is only a few instructions. As we know, updating rotation is significantly more complicated, so that’s where a lot of the time goes.
These results should be taken with lots of salt, as this is version is hardly optimal and also the profiler overhead is likely playing a part:
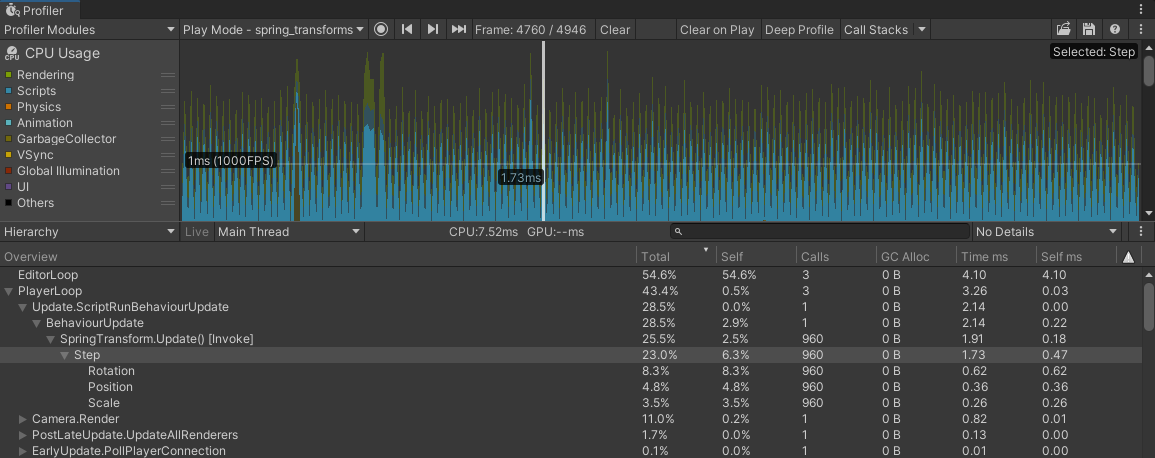 Profile of a naive implementation. 960 springs at ~1.72ms on a Ryzen 9 5900X.
You may notice that there’s a gap—the position/rotation/scale markers don’t add up to 1.72. This ends up being the transform assignment.
If you want more performance, before you go trying to find some crazy optimization for the quaternion lerps, consider a data-oriented approach first. If you’re familiar with Unity, you might be imagining the implementation of a spring transform as a component that you just drop onto a game object. Every frame, Unity will call Update() on all our spring components and they’ll run all their calculations and everything will be fine.
While this is definitely the pattern Unity encourages, having each spring effectively be its own simulation is leaving a lot on the table. Really what you want is some kind of spring manager which iterates over all the springs and updates them in sequence. This way, you can store the data for all those springs in a more data efficient way and take advantage of CPU cache properties, and if you really want to, SIMD instructions.
You can still have a component which you drop onto a game object, but rather than managing and updating itself, have it simply register a spring with some coefficient values with the manager.
We see a >2x speedup (but keep in mind the profiler overhead from before) just by putting things in arrays. These results can be considered accurate—there should be close to zero profiler overhead:
 Batch implementation. 960 springs at ~0.71ms.
For greater performance, the next step would be to do the work in jobs on other threads, ideally using the burst compiler. I wouldn’t be surprised if you see even a 10x speedup just from the burst compiler—it does good things.
Notes From the Future
2026-06-26
I realised recently that it’s actually quite limiting to have the spring transform as a component itself, which automatically affects the object’s transform.
- It stops you from layering in effects (e.g. one spring for camera movement, another for camera shake).
- It adds complexity with managing world/local spaces. If you just have a spring in an arbitrary space, then the caller decides.
- It makes it harder to batch them together.
- It stops you from simulating to arbitrary points in the future.
The fix is pretty straightforward:
- Stop
SpringTransformfrom inheriting fromMonoBehaviour. - Remove the
SetTargetLocal()/SetTargetWorld()etc distinctions. Now it’s justSetTarget(). - Replace
Update()with a functionAdvance(float dt), which simply returns aFrame. The caller can assign it to their transform (or whatever else!) as necessary.
I’m kicking myself for not realising this sooner! Egg on face! I guess that’s what dogfooding is for :)
Resources
- My implementation: https://github.com/Toqozz/blog-code/blob/master/spring_transforms/Assets/SpringTransform.cs
- Juckett’s original article: https://www.ryanjuckett.com/damped-springs/
- Another spring math explainer: https://mathproofs.blogspot.com/2013/07/critically-damped-spring-smoothing.html
- Wrap your head around what the parameters do: https://blog.maximeheckel.com/posts/the-physics-behind-spring-animations/
- Parameter explainer (again): https://www.joshwcomeau.com/animation/a-friendly-introduction-to-spring-physics/