Verlet Rope in Games
26 August, 2020
For the past month and a bit I’ve been working on a (2D) game which uses a rope as a core mechanic. I expected this to be challenging, but was (unsurprisingly) caught by a bunch of things and learnt some valuable lessons along the way, which I’m hoping to document here.
Let’s first acknowledge that rope is used pretty sparingly in video games, with good reason:
- It’s computationally expensive to simulate.
- It’s cognitively expensive to develop.
- Using physically-based rope for anything remotely interesting is full of edge cases and other hurdles.
- It can be a pain to render.
It also might just be not that exciting as a game mechanic, but we can’t work that out without solving the technical problems first.
This isn’t to say you can’t implement a rope that looks good and works fine. Actually, if you’re willing to make some concessions, believable rope is damn easy. It’s really only once the rope becomes a meaningful mechanic, and utilises things like collision, that things get a bit hairy. Hopefully I can help to solve some of these for you.
This post is largely about working in 2D, but most concepts should be able to be transferred to 3D as well. Likewise, code in this post is Unity-specific, but should be able to be adjusted to fit any language or engine.
Write Your Own Physics
Don’t make the mistake of seeing “hinge joint”, “angle joint”, or some other variation in your game/physics engine and thinking you can string a bunch of them together to make a rope. Not only will it be buggy, but you’ll have to do a lot more work to have any control over it, and any new interaction you want to code will be anxiety in a bottle.
Verlet integration–specifically position-based Verlet–is a very easy to understand method for calculating trajectories of objects, used as an alternative to something like Euler or RK4 integration. Verlet in general is used often in molecular dynamics for its high stability, but that’s not really what we’re interested in. Position-based Verlet is a great fit for simulating rope because it calculates the velocity of an object from its previous position:
const float STEP_TIME = .01f;
Vector2 gravity = new Vector2(0f, -9.8f);

// Euler (semi-implicit) approach:
// The RK4 struct would be very similar if not identical.
class EulerObject {
    public Vector2 position;
    public Vector2 velocity;
    public float mass;
}

void StepEuler(EulerObject obj) {
    // Euler (semi-implicit) calculation:
    // acceleration = force / mass;
    // next_vel = vel + (acceleration * dt);
    // next_pos = cur_pos + (next_vel * dt);
    Vector2 acceleration = gravity / obj.mass;
    obj.velocity += acceleration * stepTime;
    obj.position += velocity * stepTime;
}

// Verlet approach:
class VerletNode {
    public Vector2 position;
    public Vector2 oldPosition;
}

void StepVerlet(VerletNode node) {
    // Verlet calculation (velocity derived from previous step):
    // next_pos = cur_pos + (cur_pos - old_pos) + acceleration * dt * dt;
    // NOTE: cur_pos - old_pos is not actual velocity.  To calculate real velocity, use (cur_pos - old_pos) / dt.
    Vector2 temp = node.position;
    node.position += (node.position - node.oldPosition) + gravity * STEP_TIME * STEP_TIME;
    node.oldPosition = temp;
}
Why the names
EulerObjectandVerletNode? In your typical (Euler-based) physics engine, you expect each physical object to have some kind ofRigidbodyconcept, with a position, velocity, mass, etc, and a collider. In a Verlet-based simulation, you’re much more likely to see the integration properties (position, velocity, etc) attached to the actual vertices of the collider, if a collider is being used at all.
The implication this has is that we don’t need to do any velocity calculation ourselves to have a good looking simulation, we just need to update object positions. A good example of this behavior being useful might be to imagine an object which is programmed to follow the mouse cursor. With a position-based integrator, we can flick the mouse, release the object, and expect it to fly naturally on its own. Normally, we’d be expected to do some release velocity calculation, and then manually add the appropriate force to the Rigidbody.
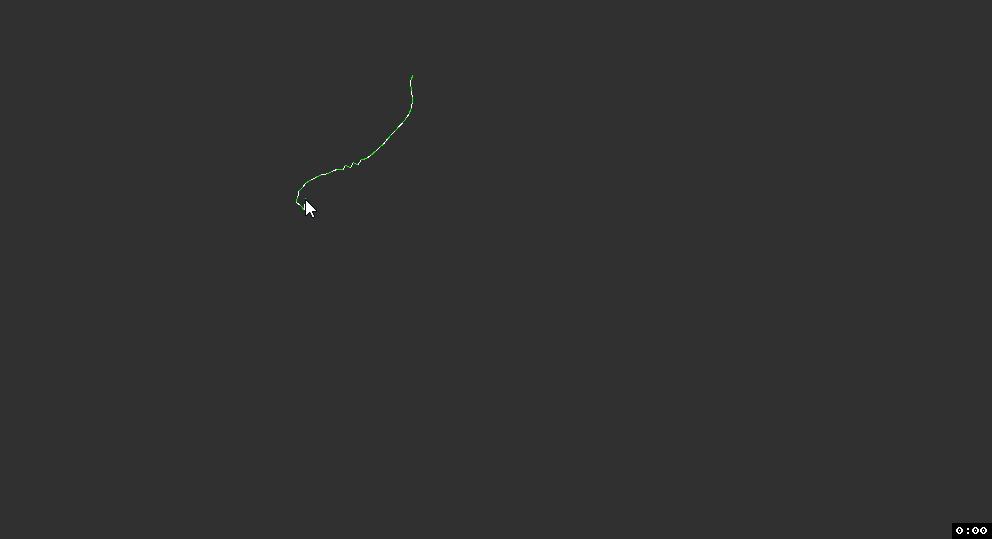
 Verlet demo (smoothing applied).
The last piece of the puzzle here is distance constraints, which aim to keep the distance between two nodes constant obviously. After applying velocity, we move the position of each node in the rope to a new one which obeys the distance constraint. This is an iterative process, and it doesn’t ensure that constraints are satisfied after it’s finished; we apply the constraints many times to get reasonably close to a solve–when I mention “iterations” throughout this post, this is what I’m referring to. Again, position-based integration makes this easier because we only need to update positions and let the simulation figure things out with the new information.
If you put all that together you’ll get something like the following:
public class VerletNode {
    public Vector2 position;
    public Vector2 oldPosition;

    public VerletNode(Vector2 startPos) {
        this.position = startPos;
        this.oldPosition = startPos;
    }
}
public class Rope : MonoBehaviour {
    public int iterations = 80;

    public int totalNodes = 40;
    public float nodeDistance = .1f;
    public Vector2 gravity;	// (0f, -20f)

    private VerletNode[] nodes;

    private void Awake() {
        nodes = new VerletNode[totalNodes];

        // Spawn nodes starting from the transform position and working down.
        Vector2 pos = transform.position;
        for (int i = 0; i < totalNodes; i++) {
            nodes[i] = new VerletNode(pos);
            pos.y -= nodeDistance;
        }
    }

    private void FixedUpdate() {
        Simulate();
        for (int i = 0; i < iterations; i++) {
            ApplyConstraints();
        }
    }

    private void Simulate() {
        for (int i = 0; i < nodes.Length; i++) {
            VerletNode node = nodes[i];

            Vector2 temp = node.position;
            node.position += (node.position - node.oldPosition) + gravity * (Time.fixedDeltaTime * Time.fixedDeltaTime);
            node.oldPosition = temp;
        }
    }

    private void ApplyConstraints() {
        for (int i = 0; i < nodes.Length - 1; i++) {
            VerletNode node1 = nodes[i];
            VerletNode node2 = nodes[i + 1];

            // First node follows the mouse, for debugging.
            if (i == 0 && Input.GetMouseButton(0)) {
                // Camera.main is terribly inefficient here, you should cache the camera.
                node1.position = cam.ScreenToWorldPoint(Input.mousePosition);
            }

            // Current distance between rope nodes.
            float diffX = node1.position.x - node2.position.x;
            float diffY = node1.position.y - node2.position.y;
            float dist = Vector2.Distance(node1.position, node2.position);
            float difference = 0;
            // Guard against divide by 0.
            if (dist > 0) {
                difference = (nodeDistance - dist) / dist;
            }

            Vector2 translate = new Vector2(diffX, diffY) * (.5f * difference);

            node1.position += translate;
            node2.position -= translate;
        }
    }
}
View the complete script on GitHub here (contains work discussed later).
That might seem like a lot to digest, but we’ve covered most of the theory. There are a few bonus things I would like to mention though:
Use Fixed Timestep
If for some bad reason you’re like me and are considering a variable delta time for your physics, the TL;DR is don’t. There are ways to simulate Verlet integration with a variable delta time, but you’ll never get the consistency of a fixed timestep, and the lack of predictable behavior is just crippling.
The GitHub version uses a custom fixed timestep implementation which can offer some more flexibility here.
Number of Iterations
The more iterations you have, the stiffer the rope will be. The more nodes you have, the more iterations you need to maintain that stiffness. So things get pretty slow if you want a long and detailed rope. If you’re in Unity and your rope is super long, you probably want to look at the Burst compiler, discussed later.
There’s also a good optimization to reduce iterations by adding an additional constraint between the first and the last node, making sure that the overall rope length stays consistent, and lessening the load for the other constraints. There is a downside oft he rope feeling a bit weird when stretched, so try both to see whether this is worthwhile for you:
// Distance constraint which reduces iterations, but doesn't handle stretchyness in a natural way.
VerletNode first = nodes[0];
VerletNode last = nodes[nodes.Length-1];
// Same distance calculation as above, but less optimal.
float distance = Vector2.Distance(first.position, last.position);
if (distance > 0 && distance > nodes.Length * nodeDistance) {
    Vector2 dir = (last.position - first.position).normalized;
    last.position = first.position + nodes.Length * nodeDistance * dir;
}
Debug Rendering
Debug rendering is as easy as drawing lines between the points. Here’s a gizmos implementation:
private void OnDrawGizmos() {
    if (!Application.isPlaying) {
        return;
    }

    for (int i = 0; i < nodes.Length - 1; i++) {
        if (i % 2 == 0) {
            Gizmos.color = Color.green;
        } else {
            Gizmos.color = Color.white;
        }

        Gizmos.DrawLine(nodes[i].position, nodes[i+1].position);
    }
}
This makes for a pretty good (and fun to play with) rope simulation! But it’s missing collision, which makes it difficult to utilize the rope mechanically.
Collision Detection and Resolution
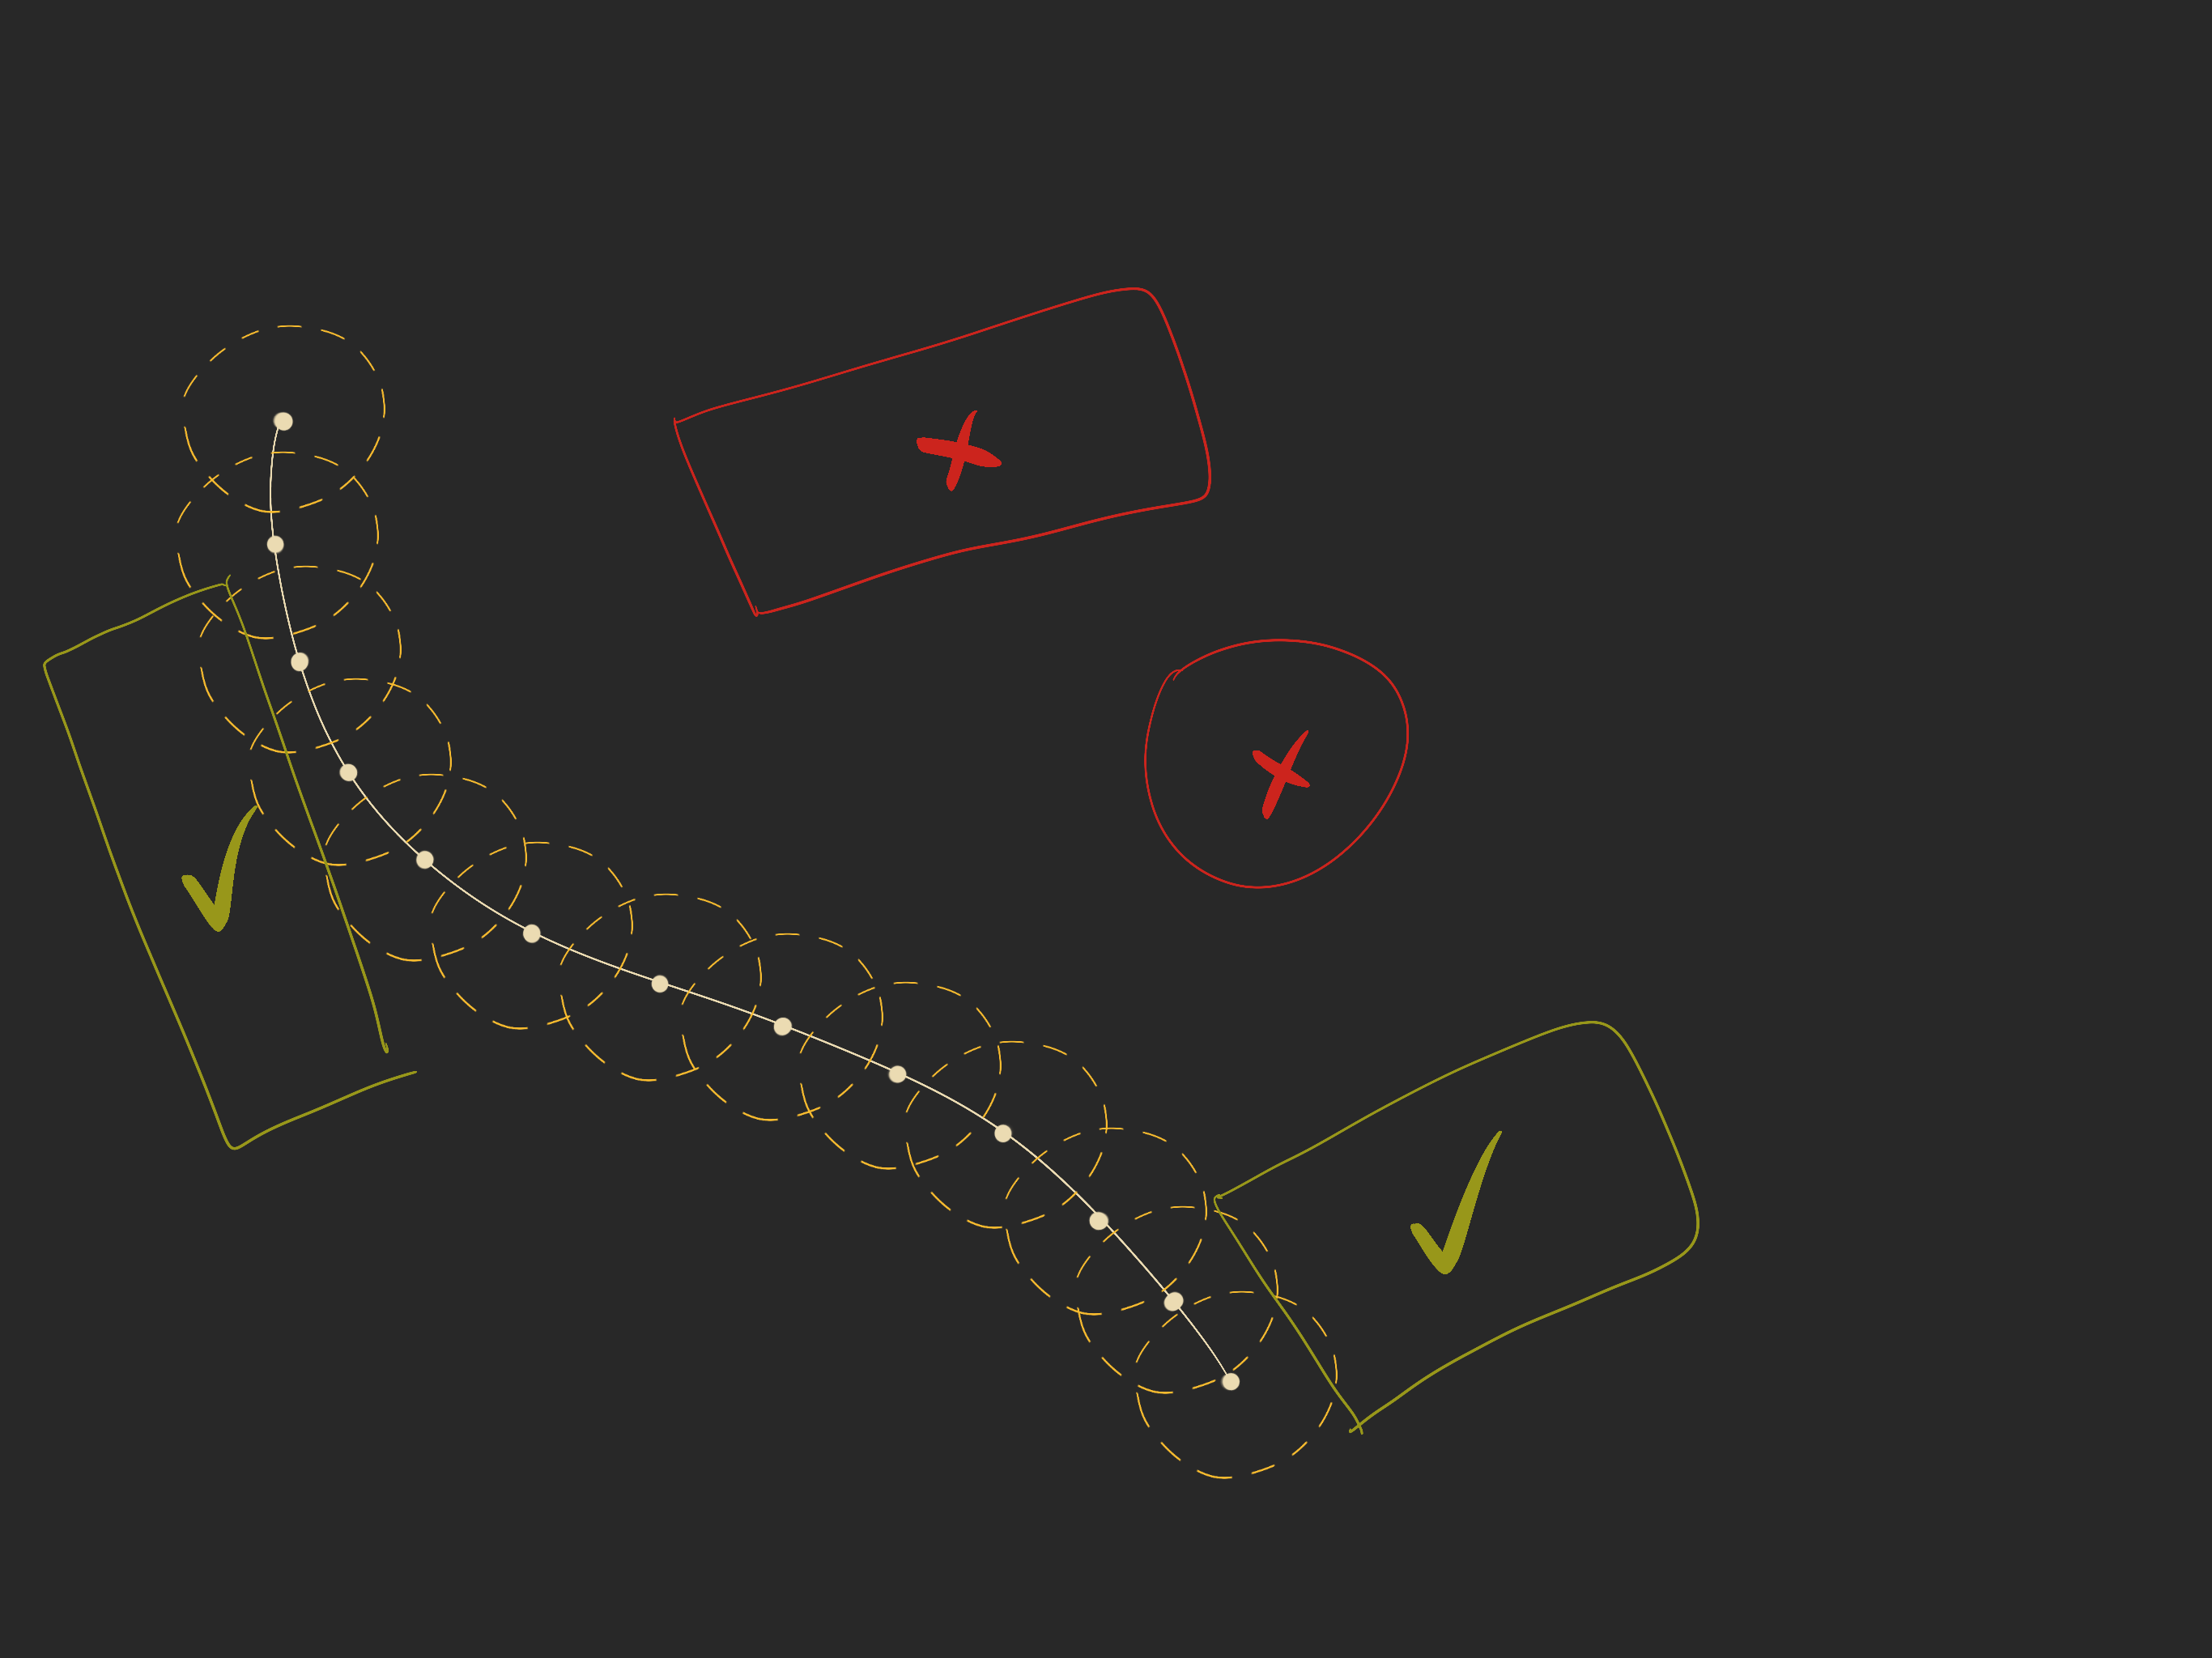
Unfortunately, collision, and more specifically collision resolution, is really the hard part of physics simulations. Our Verlet sim makes things a bit easier, but some of the stuff is still alien. I’ll be walking us through collision resolution for the 2 most basic colliders, Circle and Box.
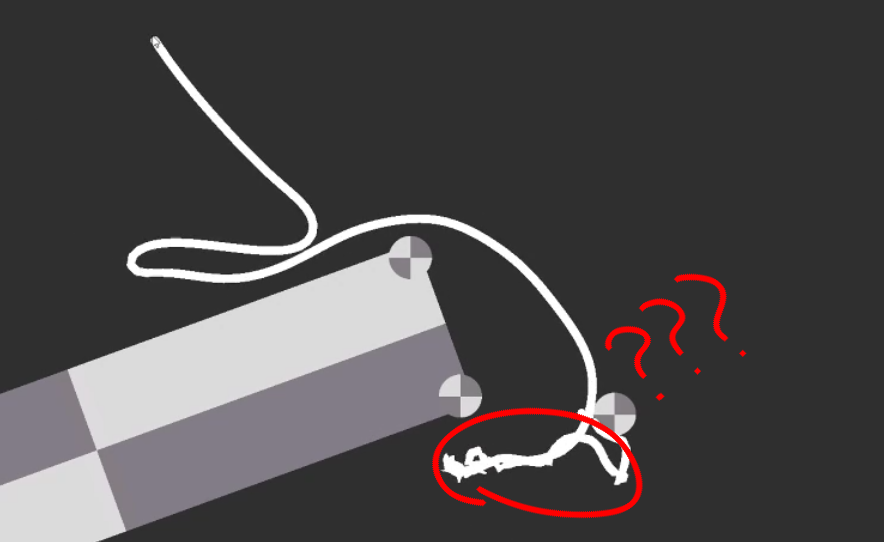
The basic idea is that we should check collisions each time we move a node, and if the node is colliding after the move then we should resolve the collision by pushing it out the shortest distance we can. This includes movement via constraints, so we need to check collision of each node every iteration.
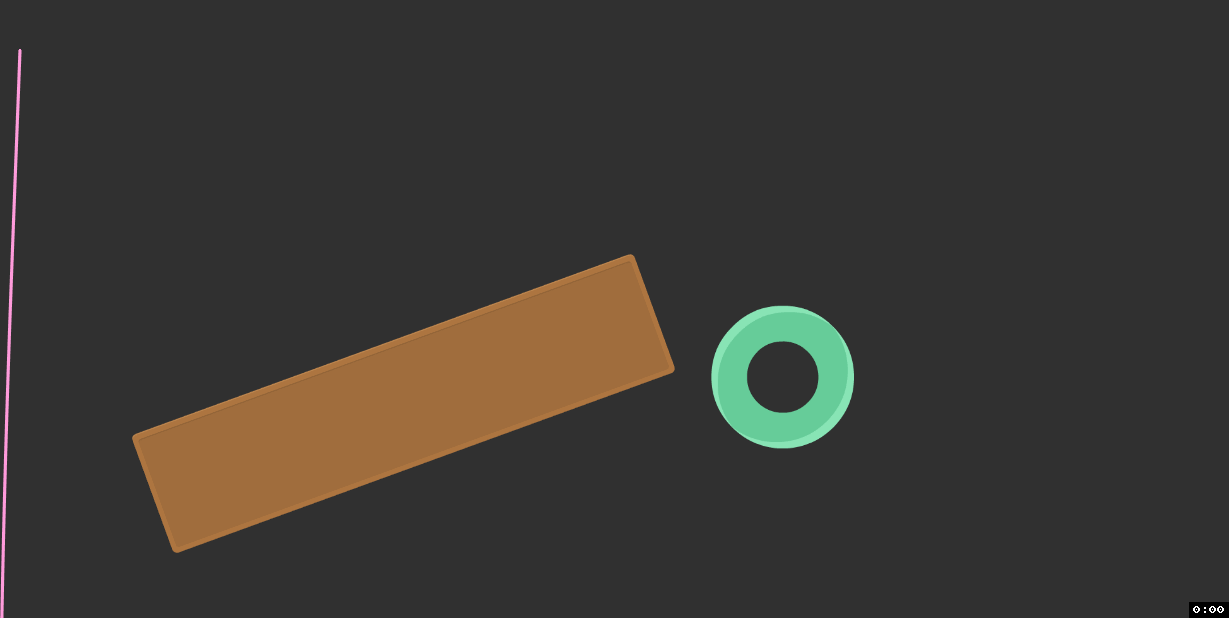
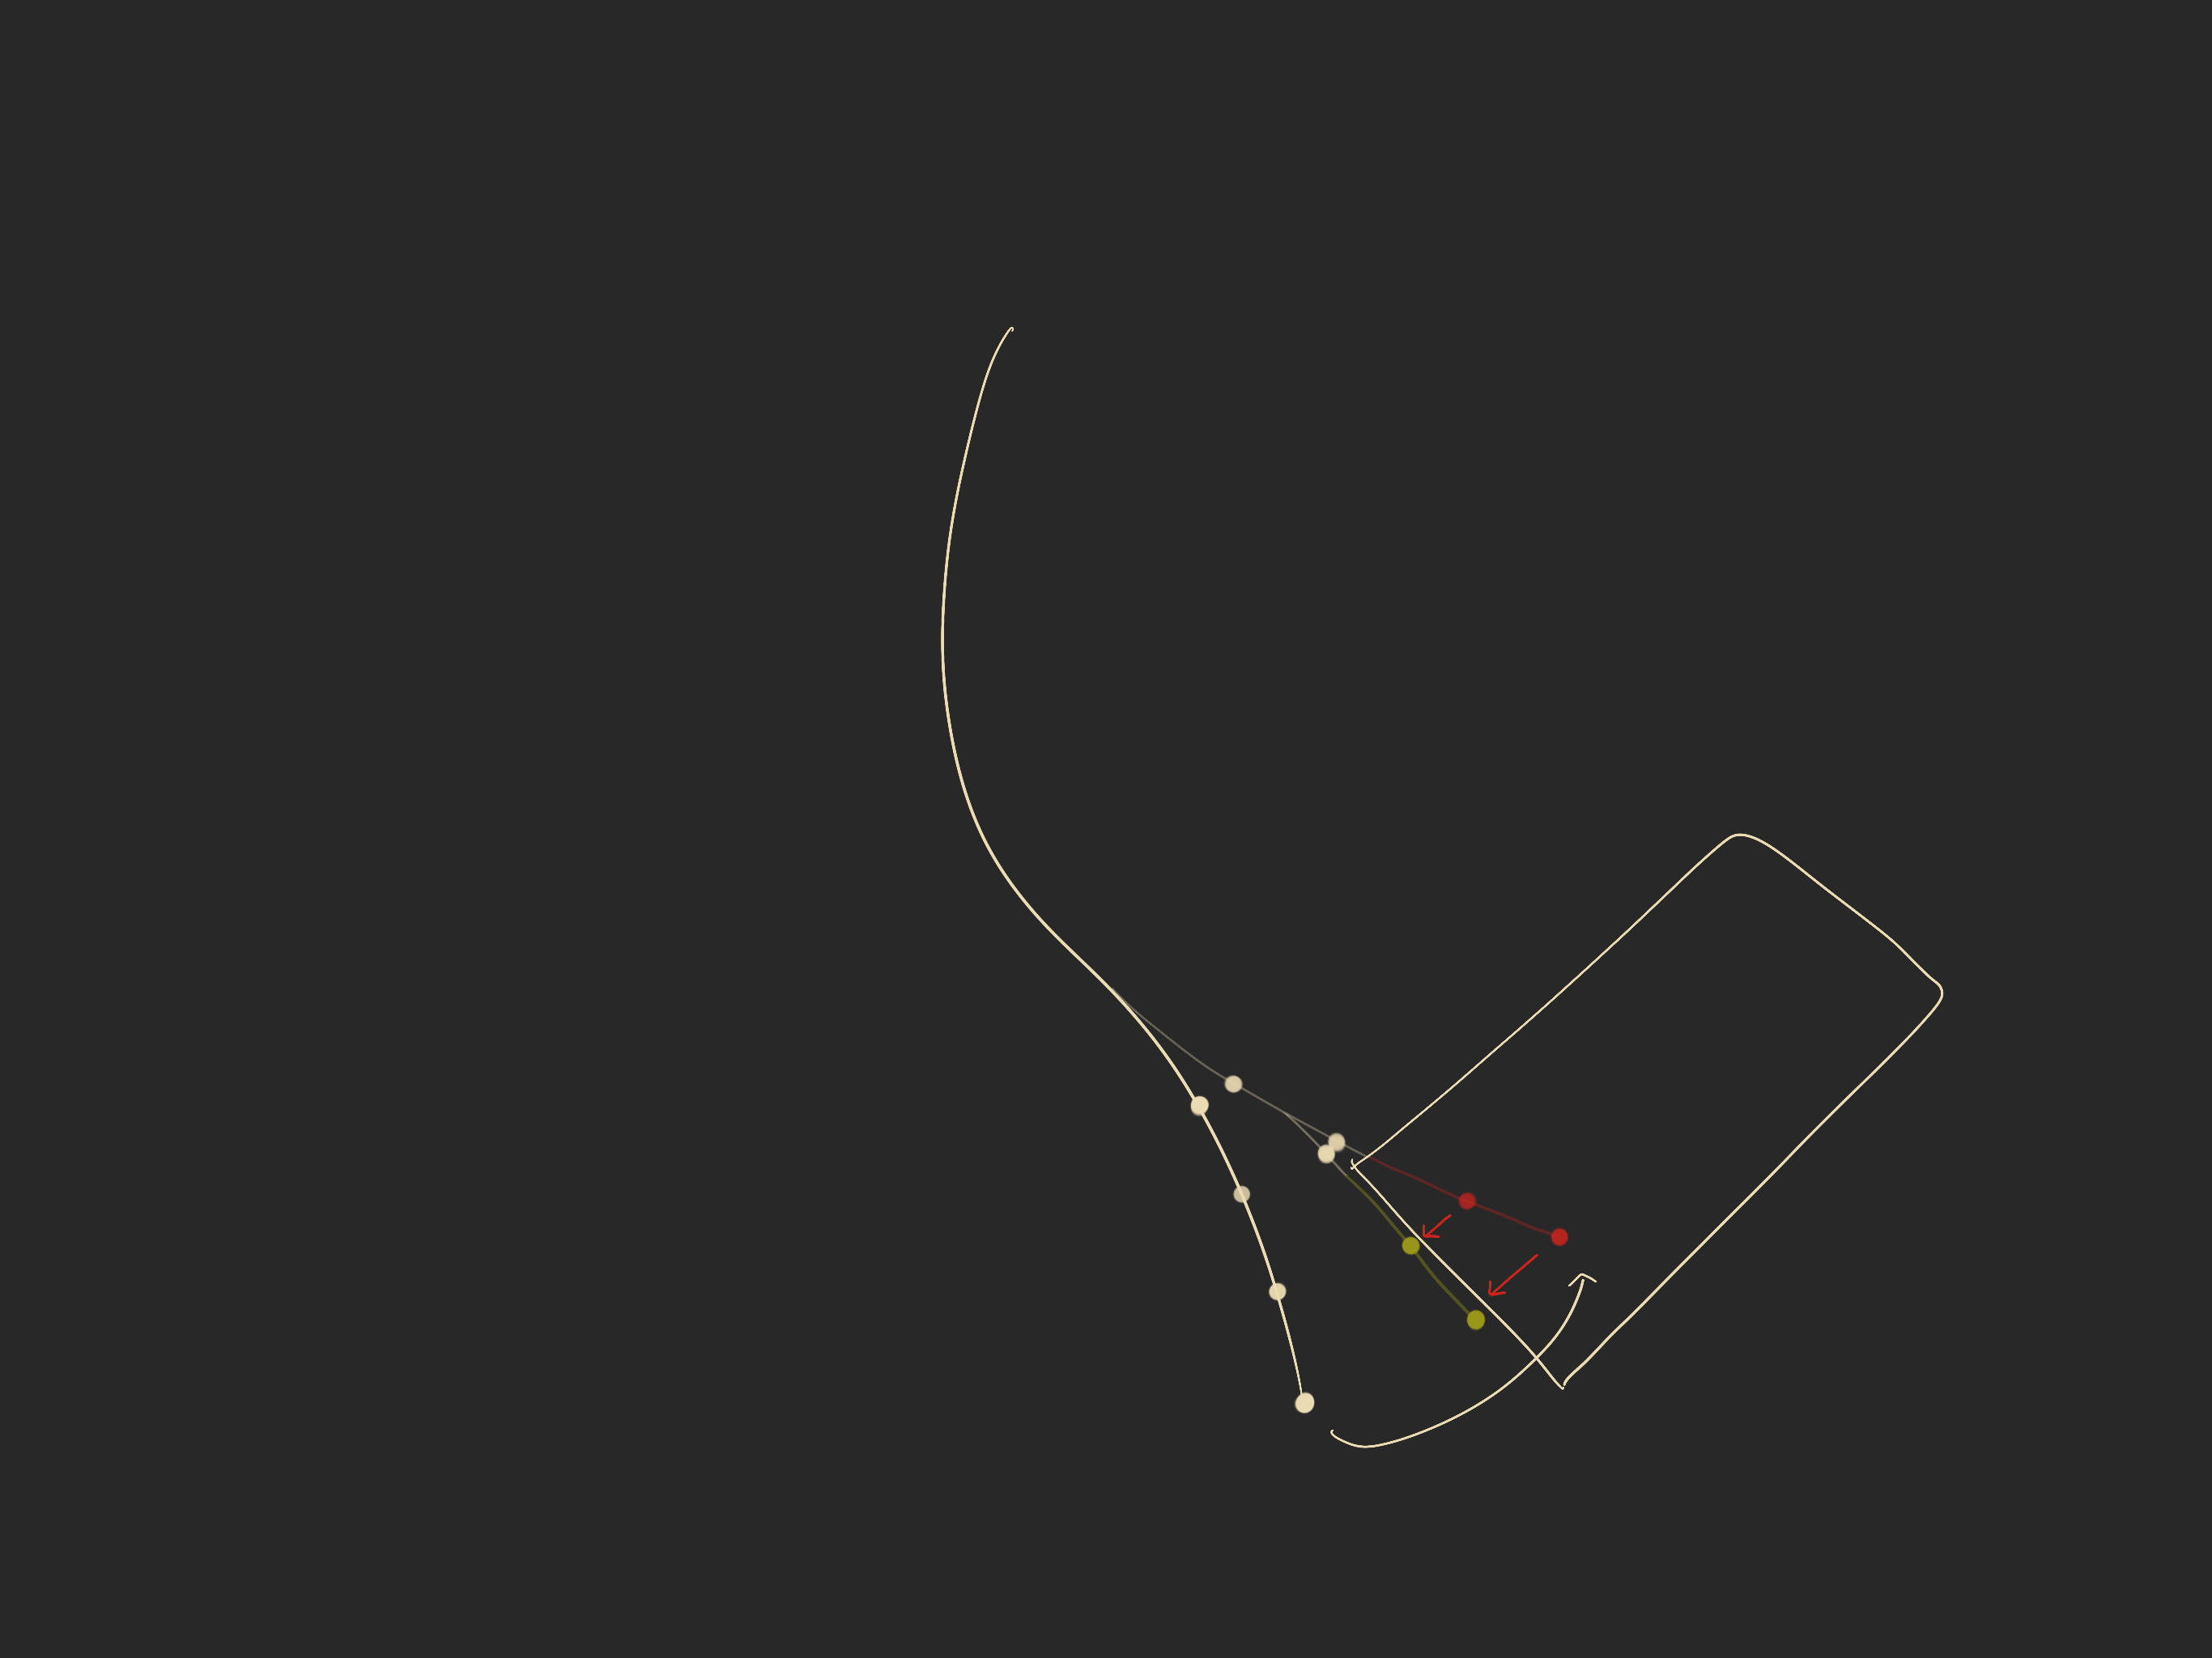 Rope swings into collider, and nodes are pushed out along the closest edge.
For relatively detailed and stiff rope (40 nodes, 80 iterations), that’s potentially 3,200 collision resolves each tick, more if nodes are touching multiple colliders at once. We’ll need something fast here.
Detection
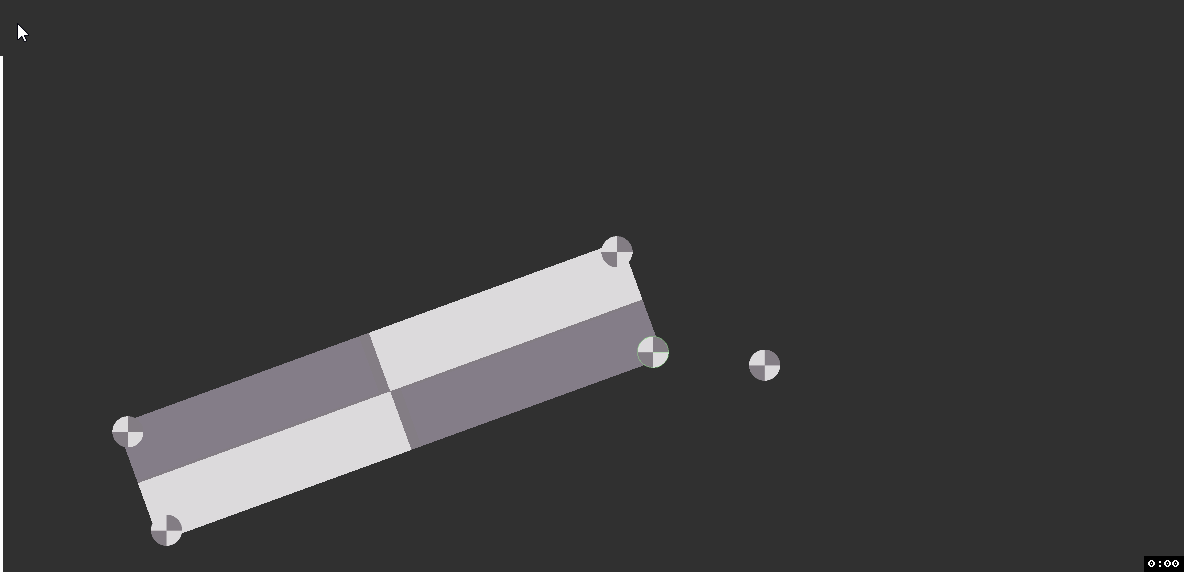
The easiest way for us to detect rope collision is to use an overlap circle around each node, which will return an array of colliders within the specified radius of said node. I mentioned before that we need to detect collision every iteration. The thing is that collision objects don’t actually move between iterations because our rope simulation all happens in a single frame, and so it doesn’t make sense to query the physics engine every iteration. What we actually want to do is take a kind of snapshot of the colliders within a reasonable distance of the rope, and use that for our entire rope step.
In Unity (and in most physics engines), colliders only update each physics tick, even if their transform moved in-between. This means we only have to update the snapshot of the latest physics steps. This is important if you’re using a custom step time for your rope.
 “Snapshot” colliders within a reasonable distance of the rope.
Here’s an excerpt of our rope script with the snapshot implementation:
enum ColliderType {
    Circle,
    Box,
    None,
}

class CollisionInfo {
    public int id;

    public ColliderType colliderType;
    public Vector2 colliderSize;
    public Vector2 position;
    public Vector2 scale;
    public Matrix4x4 wtl;
    public Matrix4x4 ltw;
    public int numCollisions;
    public int[] collidingNodes; // You probably want to use byte[] here instead, unless you have >255 nodes.

    public CollisionInfo(int maxCollisions) {
        this.id = -1;
        this.colliderType = ColliderType.None;
        this.colliderSize = Vector2.zero;
        this.position = Vector2.zero;
        this.scale = Vector2.zero;
        this.wtl = Matrix4x4.zero;
        this.ltw = Matrix4x4.zero;

        this.numCollisions = 0;
        this.collidingNodes = new int[maxCollisions];
    }
}
public class Rope : MonoBehaviour {
    // Maximum total number of colliders that the rope can touch.
    private const int MAX_ROPE_COLLISIONS = 32;
    // Collision radius around each node.  Set it high to avoid tunneling.
    private const int COLLISION_RADIUS = .5f;
    // Collider buffer size; the maximum number of colliders that a single node can touch at once.
    private const int COLLIDER_BUFFER_SIZE = 8;

    public int totalNodes;
    // -- *snip* --
    public float collisionRadius = .5f; // Snapshot radius around each node, set it high to avoid tunneling.
    private int numCollisions;
    private bool shouldSnapshotCollision;
	private CollisionInfo[] collisionInfos;
    private Collider2D[] colliderBuffer;

    private void Awake() {
        // -- *snip* --
        // Allocate collision structures.
        collisionInfos = new CollisionInfo[MAX_ROPE_COLLISIONS];
        for (int i = 0; i < collisionInfos.Length; i++) {
            // Each collider can collide with as many nodes as are in the rope.
            collisionInfos[i] = new CollisionInfo(totalNodes);
        }

        // Buffer for `OverlapCircleNonAlloc`.
        colliderBuffer = new Collider2D[COLLIDER_BUFFER_SIZE];
    }

    private void FixedUpdate() {
        shouldSnapshotCollision = true;
    }

    private int SnapshotCollisions() {
        numCollisions = 0;
        // Loop through each node and get collisions within a radius.
        for (int i = 0; i < nodes.Length; i++) {
            int collisions =
                Physics2D.OverlapCircleNonAlloc(nodes[i].position, collisionRadius, colliderBuffer);

            for (int j = 0; j < collisions; j++) {
                Collider2D col = colliderBuffer[j];
                int id = col.GetInstanceID();

                // Check if we already have this collider in our collisionInfos.
                int idx = -1;
                for (int k = 0; k < numCollisions; k++) {
                    if (collisionInfos[k].id == id) {
                        idx = k;
                        break;
                    }
                }

                // If we didn't have the collider, we need to add it.
                if (idx < 0) {
                    // Record all the data we need to use into our class.
                    CollisionInfo ci = collisionInfos[numCollisions];
                    ci.id = id;
                    ci.wtl = col.transform.worldToLocalMatrix;
                    ci.ltw = col.transform.localToWorldMatrix;
                    ci.scale.x = ci.ltw.GetColumn(0).magnitude;
                    ci.scale.y = ci.ltw.GetColumn(1).magnitude;
                    ci.position = col.transform.position;
                    ci.numCollisions = 1;	// 1 collision, this one.
                    ci.collidingNodes[0] = i;

                    switch (col) {
                        case CircleCollider2D c:
                            ci.colliderType = ColliderType.Circle;
                            ci.colliderSize.x = ci.colliderSize.y = c.radius;
                            break;
                        case BoxCollider2D b:
                            ci.colliderType = ColliderType.Box;
                            ci.colliderSize = b.size;
                            break;
                        default:
                            ci.colliderType = ColliderType.None;
                            break;
                    }

                    numCollisions++;
                    if (numCollisions >= MAX_ROPE_COLLISIONS) {
                        return;
                    }
                // If we found the collider, then we just have to increment collisions and add our node.
                } else {
                    CollisionInfo ci = collisionInfos[idx];
                    if (ci.numCollisions >= totalNodes) {
                        continue;
                    }

                    ci.collidingNodes[ci.numCollisions++] = i;
                }
            }
        }

        shouldSnapshotCollision = false;
    }
}
I apologise for the volume of code in this post; this shit is technical!
The first thing to notice is that the CollisionInfo class, which we use to hold the data we need from Collider2D. Using a reference to the Collider2D is much slower (~2x), probably due to its large size and scattered pointers, both of which are terrible for cache performance.
There’s an annoying amount of constants. Feel free to convert the arrays to lists to avoid some of these, I just prefer having control over the allocations.
An unexpected complication is that we have to do a bit of work to check whether we already have each collider before adding it. If you’re expecting many collisions (more than 30), you probably want to consider a Dictionary or some kind of Set to store the collision information. If you’re not expecting so many, a dictionary will likely just make things slower.
Resolution
Circle collisions are easily resolved by checking the node distance against the collider radius. Collisions with boxes that rotate, however, can be challenging. The easiest way is to convert our collision point to the box’s local space, which removes the scale and rotation, making it axis-aligned, which is considerably easier to work with. Once we’ve detected and resolved the collision, we can convert the no-longer-colliding point back to world space.
private void AdjustCollisions() {
    for (int i = 0; i < numCollisions; i++) {
        CollisionInfo ci = collisionInfos[i];

        switch (ci.colliderType) {
            case ColliderType.Circle: {
                float radius = ci.colliderSize.x * Mathf.Max(ci.scale.x, ci.scale.y);

                for (int j = 0; j < ci.numCollisions; j++) {
                    VerletNode node = nodes[ci.collidingNodes[j]];
                    float distance = Vector2.Distance(ci.position, node.position);

                    // Early out if we're not colliding.
                    if (distance - radius > 0) {
                        continue;
                    }

                    // Push point outside circle.
                    Vector2 dir = (node.position - ci.position).normalized;
                    Vector2 hitPos = ci.position + dir * radius;
                    node.position = hitPos;
                }
            } break;

            case ColliderType.Box: {
                for (int j = 0; j < ci.numCollisions; j++) {
                    VerletNode node = nodes[ci.collidingNodes[j]];
                    Vector2 localPoint = ci.wtl.MultiplyPoint(node.position);

                    // If distance from center is more than box "radius", then we can't be colliding.
                    Vector2 half = ci.colliderSize * .5f;
                    Vector2 scalar = ci.scale;
                    float dx = localPoint.x;
                    float px = half.x - Mathf.Abs(dx);
                    if (px <= 0) {
                        continue;
                    }

                    float dy = localPoint.y;
                    float py = half.y - Mathf.Abs(dy);
                    if (py <= 0) {
                        continue;
                    }

                    // Push node out along closest edge.
                    // Need to multiply distance by scale or we'll mess up on scaled box corners.
                    if (px * scalar.x < py * scalar.y) {
                        float sx = Mathf.Sign(dx);
                        localPoint.x =  half.x * sx;
                    } else {
                        float sy = Mathf.Sign(dy);
                        localPoint.y = half.y * sy;
                    }

                    Vector2 hitPos = ci.ltw.MultiplyPoint(localPoint);
                    node.position = hitPos;
                }
            } break;
        }
    }
}
Excellent resource on intersection tests, which explains this calculation a bit better: https://noonat.github.io/intersect/
At this point, you might want to check out the full script on GitHub to see everything with context. Note that it’s also using custom line rendering, explained below.
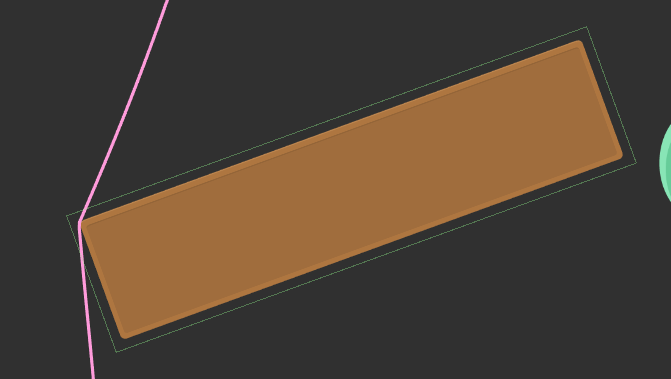
Rounding the edges on boxes with some circles can make things feel a bit better.
Performance, and the Burst Compiler
Despite fairly aggressive optimization, this rope implementation is still slower than I’m comfortable with:
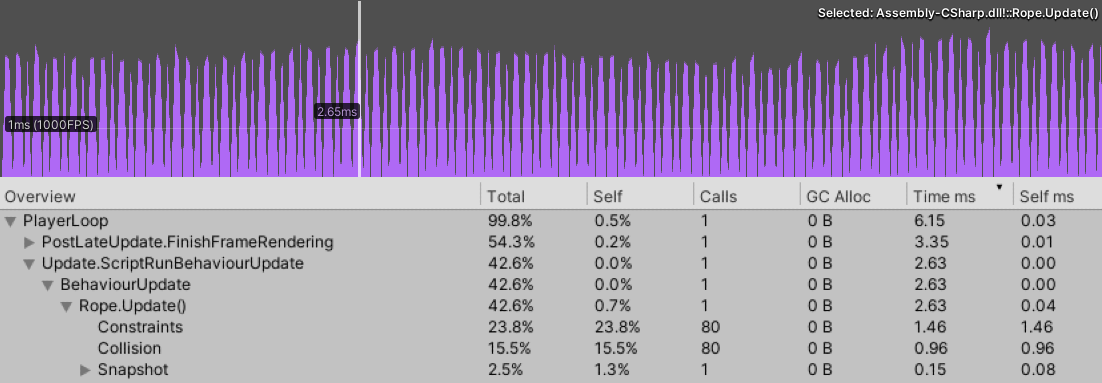
200 nodes, 80 iterations.
While I’m sure we could squeeze out a bit more performance, the improvement is unlikely to be drastic; I’m fairly sure we’re touching the edges of Unity, C# and its C# / C++ interoperability here.
Got something way faster in C#? Let me know so I can improve this post!
A concern I have here is that the performance impact of the rope is quite “spiky” because we’re updating on a fixed timestep rather than every frame. If we add many more scripts, and bring the baseline CPU time up 14ms or so, players are likely to feel this. We need to either further optimize to make spikes less noticeable, or run rope simulation in a different thread.
My first thought to improve performance was to parallelize the algorithm, but this turns out to not really be very fruitful. I don’t want to talk about this too much, but the critical part is that all granular steps depend on the step before them, so the algorithm would have to be dramatically changed to see any tangible benefit. The extent of these archetypal changes made parallel avenue ultimately not worthwhile for me. If you think it is worthwhile, this GPU cloth simulation might give you some ideas.
Luckily for us, Unity has recently introduced something called Burst, which is a compiler for generating highly optimized native code. To use it, you have to write code in a heavily limited version of C# that only supports basic primitive types (int, float, struct, etc), plus some math types (float2, float3x3, etc). Burst is designed to work within the new C# Job System thing, so you’ll probably get funneled into using that too, unless you want to make life hard, in which case it seems possible to beat it into working outside of it.
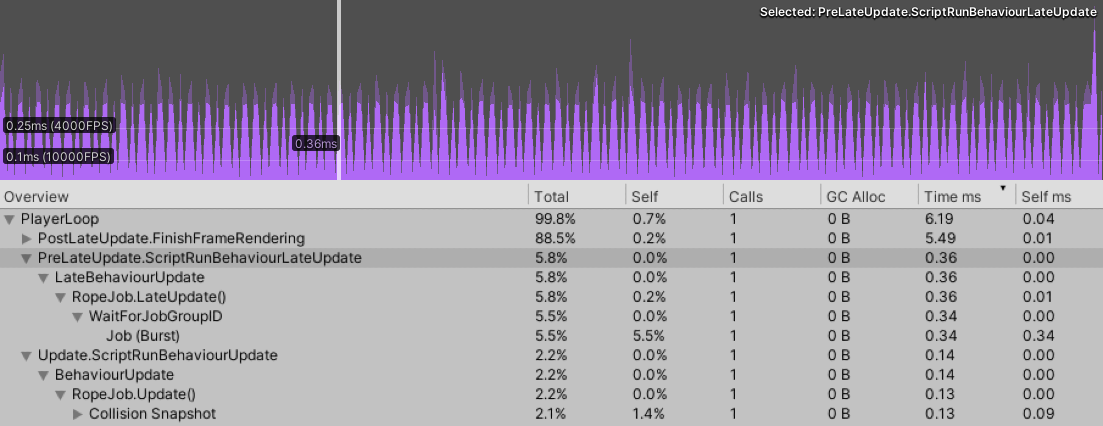
200 nodes, 80 iterations, Jobs/Burst version.
Our implementation is pretty data oriented already, so this transition isn’t as difficult as it could be, and the payoff is invaluable. We go from ~2.6ms to ~0.5ms in the above example (>5x speedup!). This post is pretty long already, so I’m not going to walk through the refactor details here–I’ve uploaded a heavily commented jobs system version of the simulation to the GitHub repository for this post, here. On top of the actual cost being less perceptible, the jobs system version actually executes in a separate thread by default, meaning the performance of other scripts won’t pile on top of it and bring the baseline up, as I was concerned about before. This does come at an ergonomic cost–multithreaded code generally does–but in this case the benefits are too important to give up. To maximize this benefit, you’ll naturally want to set the script which executes the job first in Script Execution Order.
Please note that both of these benchmarks represent a good case in terms of collision. With most nodes colliding we see ~3.7ms from the regular version and ~0.8ms from the Jobs/Burst version.
Profiling was done on a Ryzen 1700.
Changing Rope Parameters During a Job
The ergonomic cost of running our code on a separate thread is that we can’t change rope properties at any time during runtime. For example, we can’t change a node constraint while the job is running because the Unity Jobs system considers this type of behavior unsafe. This is really problematic because if we want to use the rope for gameplay, we probably want to change constraints and other rope properties all the time.
There are a few potential workarounds here:
- A command queue which takes all the rope change commands, and then applies them after the job has finished. *1 frame delay on input.
- Make sure the rope script runs first in Script Execution Order (you should be doing this already), and then only change rope properties in
LateUpdate()*1 frame delay on input. - Put scripts which change rope properties even further before the rope script in Script Execution Order. *0 frame delay on input.
Once implemented, the first approach is the easiest to use, but it comes at the cost of potential garbage collection (if you use lambdas in your implementation) and input delay. The second and third options have next to no implementation cost, but I generally recommend the second for stuff that isn’t mission critical because changing script execution order for everything is annoying. This is what the script in the repo uses.
Render Your Own Line
If you’re lucky, this won’t be a problem.
Unity includes a built-in LineRenderer component which takes a list of vertices and mostly works fine. Sometimes it doesn’t work fine though, and can make some lines pretty ugly:
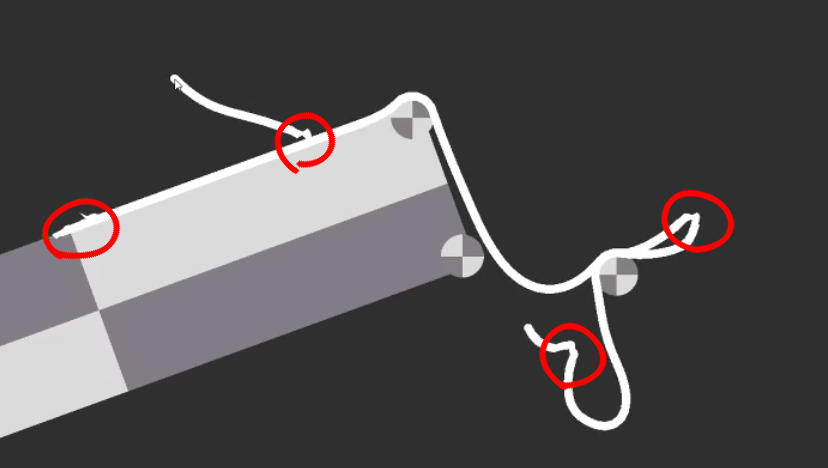
 God I love Unity features sometimes.
It turns out that good line rendering in general is a complicated problem. If you’re interested in why, I highly recommend Matt Deslauriers’ post on it. Cognizant of these complications, I advocate building something that renders our rope well, but doesn’t try to do too much else. Rendering your own line is good if you can’t live with something a bit buggy, want more control, or just want to learn. It’s also a bit faster than LineRenderer.
The line drawing approach is pretty simple. We just want to draw a rectangle between each pair of nodes, and a circle at each node to join them together:
We can render this with just a couple quads for each pair of nodes:
When it comes to actually computing this mesh, the basic solution is iterate through the line and calculate triangles, then create a mesh with the result. This would be fine were we not updating the line each frame. For a rope of 100 nodes (not uncommon for a high quality rope), that’s at least 800 operations (~2 quads per segment) every frame on the game’s main thread. I haven’t tested this, and it would probably run OK, but if we can easily do something better, we should.
If your brain is heading towards “geometry shader” right now, cool! This would be a great use for geometry shaders, but I’ve learned to avoid them as Metal (and so macOS) doesn’t support them, and they can also be quite slow in general. The life of a geometry shader is really quite tragic.
Since our line has a fixed number of vertices, we can sort of imitate a geometry shader by creating a mesh with the right number of vertices from the beginning, and then moving those vertices to the right positions in the vertex shader. It’s not as ergonomic as a geometry shader would be, but it’s pretty fast and works on all platforms.
Here’s a more concrete version of what we need to do:
- C# / Unity: Create a mesh with the right number of vertices (
totalNodes * 8). - C# / Unity: Calculate and assign triangle indices.
- Vertex Shader: Figure out which vertices relate to which rope segments, and move them to the right place.
The first and second are both part of creating the mesh. The main thing to remember when calculating triangle indices is that Unity uses a clockwise winding order, so we want our triangle indices to rotate clockwise to indicate they’re facing the camera and shouldn’t get culled;
Mesh mesh = new Mesh();
{
    Vector3[] vertices = new Vector3[totalNodes * VERTICES_PER_NODE];
    int[] triangles = new int[totalNodes * TRIANGLES_PER_NODE * 3];

    for (int i = 0; i < totalNodes; i++) {
        // 4 triangles per node, 3 indices per triangle.
        int idx = i * TRIANGLES_PER_NODE * 3;
        // 8 vertices per node.
        int vIdx = i * VERTICES_PER_NODE;

        // Rect between segments.
        triangles[idx + 0] = vIdx;        // v1 top
        triangles[idx + 1] = vIdx+1;      // v2 bottom
        triangles[idx + 2] = vIdx+2;      // v1 bottom
        triangles[idx + 3] = vIdx;        // v1 top
        triangles[idx + 4] = vIdx+3;      // v2 top
        triangles[idx + 5] = vIdx+1;      // v2 bottom

        // End cap quad.
        triangles[idx + 6] = vIdx+4;      // tl
        triangles[idx + 7] = vIdx+7;      // br
        triangles[idx + 8] = vIdx+6;      // bl
        triangles[idx + 9] = vIdx+4;      // tl
        triangles[idx + 10] = vIdx+5;     // tr
        triangles[idx + 11] = vIdx+7;     // br
    }

    // We only really care about the number of vertices, not what they actually are -- the positions aren't used.
    mesh.vertices = vertices;
    mesh.triangles = triangles;
    // Since we pretty much want the rope to always render (it's always going to be on screen if it's active), we
    // just set the bounds super large to avoid recalculating the bounds when the rope changes.
    mesh.bounds = new Bounds(Vector3.zero, Vector3.one * 100f);
}
And here’s a stripped version of the moving shader – check the full version on GitHub here.
v2f vert (appdata v) {
    v2f o;
    o.uv = float2(0, 0);

    // The node that the current vertex is associated with.
    int idx = v.id / VERTICES_PER_NODE;
    // The next node, clamped to the max number of nodes.
    int next_idx = min(MAX_NODE_COUNT-1, idx+1);
    float4 p1 = _Points[idx];
    float4 p2 = _Points[next_idx];
    int id = v.id % VERTICES_PER_NODE;

    float2 dir = normalize(p2.xy - p1.xy);
    float2 perp = float2(-dir.y, dir.x);   // Counter-clockwise perpendicular to dir.

    // Currently, each line segment has 8 vertices -- 4 for the line and 4 for the start cap.
    // Comments are written as though p1 -> p2 is going left to right.
    float2 pos;
    if (id == 0) {          // Vertex 1, v1 top.
        pos = p1.xy + perp * _Width;
    } else if (id == 1) {   // Vertex 2, v2 bottom.
        pos = p2.xy - perp * _Width;
    } else if (id == 2) {   // Vertex 3, v1 bottom.
        pos = p1.xy - perp * _Width;
    } else if (id == 3) {   // Vertex 4, v2 top.
        pos = p2.xy + perp * _Width;

    } else if (id == 4) {   // Vertex 5, cap tl.
        pos = p1.xy + float2(-_Width, _Width);
        o.uv = float2(0, 1);
    } else if (id == 5) {   // Vertex 6, cap tr.
        pos = p1.xy + float2(_Width, _Width);
        o.uv = float2(1, 1);
    } else if (id == 6) {   // Vertex 7, cap bl.
        pos = p1.xy + float2(-_Width, -_Width);
        o.uv = float2(0, 0);
    } else if (id == 7) {   // Vertex 8, cap br.
        pos = p1.xy + float2(_Width, -_Width);
        o.uv = float2(1, 0);
    }

    o.clipPos = mul(UNITY_MATRIX_VP, float4(pos, 0, 1));

    return o;
}

fixed4 frag (v2f i) : SV_Target {
    float4 col;
    // Could replace this `if` easily with lerp, but this is more readable for now.
    if (i.endCap) {
        float dist = distance(i.uv, float2(0.5, 0.5));
        col = _Color;
        col.a = step(0.5, 1.0 - dist);
    } else {
        col = _Color;
    }

    return col;
}
Experienced developers, don’t be too upset at me for manually getting id in the shader, and then using an if ... else chain to move vertices. This code is plenty fast (~0.006ms in RenderDoc) and serves its purpose in a straightforward way.
For those wanting something more efficient, or wondering on best practices, the best way to do this is to assign the right information to vertices directly using SetVertexBufferParams() to avoid the if ... else chain. Non-Unity users, look for something related to VertexAttributes in your engine / graphics library.
Questions:
I downloaded the example project off GitHub and I get errors about float2 not existing and stuff like that.
Make sure the Burst package is installed. This post was written using version 1.2.3. (In the Unity editor: Window -> Package Manager -> All Packages (in the dropdown) -> Search for Burst)
In the non-Burst version, aren’t structs faster than classes?
In my testing, marginally (~5%). This seems worth doing in production, and is even required for using the burst compiler, but adds noise to the code snippets in the post, so I decided not to include this optimization in writing. The Burst version in the repo uses structs.
In SnapshotCollisions(), isn’t it wasteful to throw away old CollisionInfos?
If your colliders are static, yes. You could optimize this for a large number of colliders by implementing some sort of cache which holds CollisionInfos for longer than a physics tick if they’re used frequently. Even if they aren’t static, I’m sure there’s gains to be had from only updating changed data such as position.
Having said that, SnapshotCollision() only takes about ~0.2ms on my machine, so profile first to check if this is actually worth doing.
The Rope.cs version on GitHub doesn’t use FixedUpdate() like in the example snippet, what gives?
The GitHub version uses a custom fixed update cycle rather than the built-in FixedUpdate(). The primary reason for this is control. If rope is an important mechanic in your game, it can be useful to be able to change its tick rate independently from regular physics. I also haven’t talked about any interpolation here, so I really wanted to provide a custom update implementation.
A custom update is also required for the Jobs version, so we save ourselves some work on the refactor.
Collision doesn’t work properly when sprites are using SpriteDrawMode.Tiled or SpriteDrawMode.Sliced.
This is because Unity has decided to separate this property entirely from the transform, and scales sprites all on its own. This means we can have an oddly scaled sprite even with a scale of (1, 1, 1). I’m sure there’s a good reason for this, but it’s really annoying.
To remedy this we can manually create the transformation matrix with the scale adjusted when we snapshot collisions:
CollisionInfo ci = collisionInfos[numCollisions];
ci.id = id;
ci.scale.x = math.length(ci.ltw.c0.xyz);
ci.scale.y = math.length(ci.ltw.c1.xyz);
ci.position = (Vector2) col.transform.position;
ci.numCollisions = 1; // 1 collision, this one.

var sr = col.GetComponent<SpriteRenderer>();
if (sr != null && sr.drawMode != SpriteDrawMode.Simple) {
    ci.scale.x *= sr.size.x;
    ci.scale.y *= sr.size.y;
    ci.ltw = float4x4.TRS(col.transform.position, col.transform.rotation, math.float3(ci.scale.x, ci.scale.y, 1f));
    ci.wtl = math.inverse(ci.ltw);
} else
    ci.wtl = col.transform.worldToLocalMatrix;
    ci.ltw = col.transform.localToWorldMatrix;
}
This isn’t without issue. For some reason the “real” collider is slightly bigger than what we arrive at with a manually constructed matrix:
My guess is that this is related to slice boundaries.
Another solution is to just have the collider separate from the sprite and scale it normally.
The Collider2D.offset property doesn’t work.
The offset property doesn’t work because the collision code hasn’t implemented it. If you need offset, you can implement it quite easily for boxes by first of all adding a CollisionInfo.offset property, and then applying it at the appropriate point in collision:
// Box collision:

// If distance from center is more than box "radius", then we can't be colliding.
Vector2 half = ci.colliderSize * .5f;
Vector2 scalar = ci.scale;
//float dx = localPoint.x;
float dx = localPoint.x - ci.offset.x;
float px = half.x - Mathf.Abs(dx);
if (px <= 0) {
    continue;
}

//float dy = localPoint.y;
float dy = localPoint.y - ci.offset.y;
float py = half.y - Mathf.Abs(dy);
if (py <= 0) {
    continue;
}

// Need to multiply distance by scale or we'll mess up on scaled box corners.
if (px * scalar.x < py * scalar.y) {
    float sx = Mathf.Sign(dx);
    //localPoint.x = half.x * sx;
    localPoint.x = ci.offset.x + half.x * sx;
} else {
    float sy = Mathf.Sign(dy);
    //localPoint.y = half.y * sy;
    localPoint.y = ci.offset.y + half.y * sy;
}
Note that offset is in local space, so we can’t easily apply it to Circle colliders with the provided implementation. You’ll need to switch to something which transforms to local space (slow), like in the box collision method.
How can I prevent tunneling?
My first and easiest suggestion is to try to reduce maxSimMove and decrease step time. This should reduce tunneling by stopping nodes from moving too much in a single step. However, if your colliders are small or you need a particularly fast moving rope, then this isn’t a good solution.
Ideally we’d raycast between the previous and current position to detect and prevent tunneling This is pretty complicated, and very slow if done naively. We’d probably have to implement some kind of raycasting ourselves!
The best quick and dirty solution I’ve got for you is to keep track of node positions before adjusting constraints, and then do multiple collision checks at the collision phase (AdjustCollisions()), incrementing from the previous positions to the new position until a collision is found (if any). This should stop tunneling with a small enough increment. To take this idea to the next level, you probably want to implement a line intersection test (i.e. raycasting).